You can now deploy and host ChatGPT Apps on mcp-agent cloud, our MCP-native platform.
No complex infra. No manual setup. Just write your app, connect it, and deploy in minutes.
💬 What Are ChatGPT Apps
ChatGPT Apps let you create interactive experiences that live inside ChatGPT conversations.
Apps can connect to APIs, databases, or services and respond with in-chat UI elements such as maps, charts, or playlists.
ChatGPT Apps are powered by the Model Context Protocol (MCP), which allows ChatGPT to talk directly to external services through a structured interface.
⚙️ What is mcp-agent
mcp-agent is an open-source toolkit and hosting platform for developers building MCP servers and ChatGPT Apps.
It helps you:
- Build and run MCP servers locally or in the cloud
- Simplify connection between your ChatGPT App and backend
- Manage deployment, logging, and configuration automatically
In short, mcp-agent is the bridge between your Python app and ChatGPT.
With mcp-agent cloud, you can host your MCP server and get a public endpoint ready for ChatGPT in minutes.
🧠 Quick Start: Deploy Your ChatGPT App
TL;DR
- Create an
MCPApp()in your Python server code - Install the
mcp-agentlibrary - Deploy with the
mcp-agentCLI
1️⃣ Prerequisites
2️⃣ Install Dependencies
Using uv (recommended):
uv init
uv sync
Or with pip:
pip install mcp-agent
pip install fastapi
3️⃣ Create an MCPApp()
MCPApp is what connects your MCP server to mcp-agent cloud.
Here’s a minimal example:
from mcp_agent.app import MCPApp
from fastmcp import FastMCP  # import if your project uses FastMCP

mcp = FastMCP(
    name="your-app-name",
    message_path="/sse/messages",  # aligns with your SSE path
    stateless_http=True,           # recommended for cloud hosting
)

## Register your MCP server as an mcp-agent App
app = MCPApp(
    name="your-app-name",
    description="your-app-description",
    mcp=mcp,
)

## Your ChatGPT Application code here
These few lines are what make your app discoverable and deployable by mcp-agent cloud.
4️⃣ Add Deployment Config and Secrets
At your repo root, create two files:
mcp_agent.config.yaml
execution_engine: asyncio

name: "your-app-name"
description: "your-app-description"

logger:
  transports: [console, file]
  level: info
  path: logs/mcp-agent.log
mcp_agent.secrets.yaml
## Optional: include API keys, tokens, or secrets here
5️⃣ Deploy to mcp-agent Cloud
Using uv:
uv run mcp-agent login
uv run mcp-agent deploy --no-auth
Or with venv:
mcp-agent login
mcp-agent deploy --no-auth
Support for OAuth coming soon
After a successful deploy, you’ll see a cloud URL like:
https://.deployments.mcp-agent.com/sse
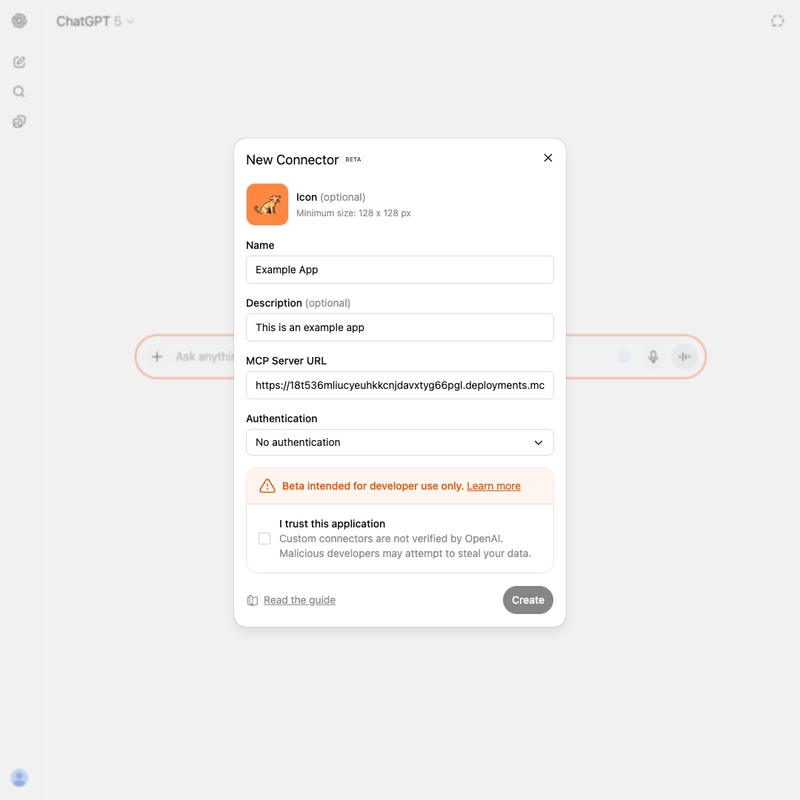
6️⃣ Connect to ChatGPT
- Enable Developer Mode in ChatGPT
- Go to Settings → Connectors
- Add your app’s cloud URL (make sure it ends with
/sse)

ChatGPT connects to the
/sseendpoint, so that suffix is required.
🧰 Troubleshooting
404 or Connection Errors:
Make sure your URL ends with /sse and your app’s message_path is /sse/messages.
Auth Errors:
If deploy fails, run mcp-agent login.
If ChatGPT can’t connect, make sure you deployed with --no-auth for open access.
Debugging:
Use MCP Inspector to test and validate your MCP server locally.
🧩 Example Projects
❤️ Wrapping Up
ChatGPT Apps are a new way to create interactive, conversational tools that live right inside ChatGPT.
With mcp-agent cloud, deploying one is as simple as:
mcp-agent deploy --no-auth
And just like that, your ChatGPT App is live and ready for anyone to use.