Event-driven applications aren’t new, but the patterns and discussion in the context of the cloud are hard to miss these days. It’s hard to argue with the patterns and practices because with events, I can build systems that are more reliable, available, and tolerant of fault and issues that arise both in and out of my control. I’ve actually written quite a bit about building event-driven systems with serverless technologies like Lambda, SQS, SNS, EventBridge, and DynamoDB, but I don’t want to explore familiar topics here. What if I took that a different direction and built an event-driven consumer inside a Kubernetes and more specifically Amazon Elastic Kubernetes Service (EKS) deployment? The building blocks would be the same, SQS for instance, but can I replace Lambda and how would that work? Let’s dive into Event-Driven Pods with KEDA and EKS.
Architecture and Design
If you want to follow along or just want to get right to the details, here is the Github repository that has the working implementation that I’m going to go through below. There’s a helpful README and a QuickStart so if you want to get going.
I’m doing something a little different for this article and using Claude Code to help me generate code and diagrams. I assure you the writing is still 100% mine, but spell- and grammar-checked again with my friend Claude. In that spirit, here’s a diagram showing how the architecture I’m working on comes together.
┌───────────────────────────────────────────────────────────────────────────────┐
│                                    AWS Cloud                                  │
│                                                                               │
│  ┌────────────────────────────────────────────────────────────────────────┐   │
│  │                              Amazon EKS Cluster                        │   │
│  │                                                                        │   │
│  │  ┌──────────────────────────────────────────────────────────────────┐  │   │
│  │  │                        Kubernetes Control Plane                  │  │   │
│  │  │                         (Managed by AWS)                         │  │   │
│  │  └──────────────────────────────────────────────────────────────────┘  │   │
│  │                                    │                                   │   │
│  │  ┌──────────────────────────────────────────────────────────────────┐  │   │
│  │  │                           Worker Nodes                           │  │   │
│  │  │                                                                  │  │   │
│  │  │  ┌─────────────────┐    ┌─────────────────┐    ┌──────────────┐  │  │   │
│  │  │  │   keda namespace│    │ default         │    │ System Pods  │  │  │   │
│  │  │  │                 │    │                 │    │              │  │  │   │
│  │  │  │ ┌─────────────┐ │    │ ┌─────────────┐ │    │ • CoreDNS    │  │  │   │
│  │  │  │ │ KEDA        │ │    │ │   Rust SQS  │ │    │ • kube-proxy │  │  │   │
│  │  │  │ │ Operator    │ │◄───┤ │ Processor   │ │    │ • AWS Node   │  │  │   │
│  │  │  │ │             │ │    │ │ Deployment  │ │    │   Daemonset  │  │  │   │
│  │  │  │ └─────────────┘ │    │ │             │ │    └──────────────┘  │  │   │
│  │  │  │                 │    │ │ ┌─────────┐ │ │                      │  │   │
│  │  │  │ ┌─────────────┐ │    │ │ │ Pod 1   │ │ │                      │  │   │
│  │  │  │ │ Metrics     │ │    │ │ └─────────┘ │ │                      │  │   │
│  │  │  │ │ Server      │ │    │ │ ┌─────────┐ │ │                      │  │   │
│  │  │  │ └─────────────┘ │    │ │ │ Pod 2   │ │ │                      │  │   │
│  │  │  │                 │    │ │ └─────────┘ │ │                      │  │   │
│  │  │  │ ┌─────────────┐ │    │ │     ...     │ │                      │  │   │
│  │  │  │ │ Admission   │ │    │ │ ┌─────────┐ │ │                      │  │   │
│  │  │  │ │ Webhooks    │ │    │ │ │ Pod N   │ │ │                      │  │   │
│  │  │  │ └─────────────┘ │    │ │ └─────────┘ │ │                      │  │   │
│  │  │  └─────────────────┘    │ │             │ │                      │  │   │
│  │  │                         │ │ ┌─────────┐ │ │                      │  │   │
│  │  │                         │ │ │   HPA   │ │ │                      │  │   │
│  │  │                         │ │ └─────────┘ │ │                      │  │   │
│  │  │                         │ │             │ │                      │  │   │
│  │  │                         │ │ ┌─────────┐ │ │                      │  │   │
│  │  │                         │ │ │Scaled   │ │ │                      │  │   │
│  │  │                         │ │ │Object   │ │ │                      │  │   │
│  │  │                         │ │ └─────────┘ │ │                      │  │   │
│  │  │                         │ └─────────────┘ │                      │  │   │
│  │  │                         └─────────────────┘                      │  │   │
│  │  └──────────────────────────────────────────────────────────────────┘  │   │
│  └────────────────────────────────────────────────────────────────────────┘   │
└───────────────────────────────────────────────────────────────────────────────┘
The key elements of this solution to dig through and configure:
- Kubernetes (EKS)
- Deployment with Docker Image built from source
- KEDA
- Includes the KEDA Operator
- ScaledObject which is the resource that handles interacting with Metrics and Horizontal Pod Autoscaler
- TriggerAuthentication is a resource that allows our scaler to use the Pod’s identity
- IRSA which is IAM Roles for Service Accounts which let’s our pods assume an IAM role and the policies attached.
Once deployed, I’m going to use the KEDA ScaledObject (Scaler) to monitor an AWS SQS for queue depth and then spin up pods in my Deployment that can handle those messages and do something with each payload. A very traditional competing consumers pattern implemented as a scale-to-zero deployment with Kubernetes.
SQS Queue ──► KEDA Operator ──► ScaledObject ──► HPA ──► Deployment ──► Pods
    │              │                │            │           │          │
    │              │                │            │           │          │
    └──────────────┼────────────────┼────────────┼───────────┼──────────┘
                   │                │            │           │
                   ▼                ▼            ▼           ▼
             Metrics Query    Scale Decision   Pod Count   Message
            (Every 15s)      (Queue ÷ 5)     Adjustment  Processing

Timeline:
1. KEDA queries SQS queue depth every 15 seconds
2. If queue has messages: KEDA calculates desired pods = ceiling(messages ÷ 5)
3. KEDA updates HPA with external metrics
4. HPA scales deployment up/down
5. New pods start and begin processing messages
6. When queue is empty, pods scale down after 300s cooldown
Event-Driven Pods with KEDA and EKS
Foundationally, I could start with the cluster or with the SQS. I tried to keep things granular so they could be run separately but not so much that they didn’t make sense. One big script to do the whole deploy would be nice, but it wouldn’t highlight the pieces quite as well. Perhaps that’s a future enhancement.
Here are the dependencies you’ll need to follow along:
- Rust 1.80 or later
- Docker
- AWS account
- AWS CLI configured
- eksctl installed (for cluster creation)
EKS Cluster
The project repository has a directory called kubernetes which houses the things I’m going to use to build and configure the cluster. A directory underneath that is cluster which is where my cluster configuration is located.
---
apiVersion: eksctl.io/v1alpha5
kind: ClusterConfig

metadata:
  name: sandbox
  region: us-west-2

managedNodeGroups:
  - name: mng-arm
    instanceType: m6g.large
    desiredCapacity: 2
This file will be fed into the eksctl CLI that will build my EKS cluster. One thing to note is that I’m using m6g instances for my node pool. Those are ARM chips running AWS Graviton.
SQS
I could use something like CDK or Terraform, but in this case I’m just building a simple SQS standard queue so I’m using CloudFormation wrapped in a script.
The queue has a few properties set on it, but overall it’s not exotic.
# Snippet
Resources:
  SQSQueue:
    Type: AWS::SQS::Queue
    Properties:
      QueueName: !Ref QueueName
      VisibilityTimeout: !Ref VisibilityTimeout
      MessageRetentionPeriod: !Ref MessageRetentionPeriod
      DelaySeconds: !Ref DelaySeconds
There is a script in the ./scripts directory for running this YAML file and it’ll output the ARN of the queue for use in other parts of the applications.
Now having a cluster and queue, I can start applying KEDA and the application.
KEDA
KEDA stands for Kubernetes Event-Driven Autoscaling. Over the past few years, the Serverless world has taken advantage of the wonderful integrations that Lambda provides when connecting to DynamoDB, SQS, EventBridge, and many other elastic services. KEDA brings a lot of the configurability that comes with Lambda into Kubernetes in the way of curated “scalers”. And then if you don’t see what you like, you can always build your own.
For a list of scalers, start here. And then more specifically, the SQS Scaler that I’ll be using.
What KEDA will do for me is monitor the resource via the scaler definition and then expand or collapse my pod count so that I have enough compute to handle the demand. But before I can configure the scaler, I need to install KEDA. To do that, I run this script.
./kubernetes/scripts/install-keda.sh. This script will update Helm and then run a Helm install to create the namespace and KEDA’s required components. Once I’ve run this script. I’ll see three KEDA pods.
> kubectl get pods -n keda
NAME                                              READY   STATUS    RESTARTS   AGE
keda-admission-webhooks-7fc99cdd4d-ncbzn          1/1     Running   0          10h
keda-operator-75bc596ffb-wrqsm                    1/1     Running   0          9h
keda-operator-metrics-apiserver-c5b6f8b88-278ws   1/1     Running   0          10h
Now that I have KEDA installed, I want to have the ability for KEDA to use IRSA when working with SQS. You can read more from AWS on IRSA
I’ve scripted this configuration ./kubernetes/setup-keda-irsa.sh. The script will verify that the OIDC provider has been associated with the cluster, create a service account, and build a role for working with SQS. You’ll see further down that I opt to use the application’s pod identity as opposed to the KEDA operator identity, so this step is not truly needed, but it put it in for flexibility.
Deploying the Application
IRSA is 100% required as I look to deploy the actual application. Since I’m using the KEDA scaler with the pod’s identity, then my pod needs IRSA to communicate with the resources that I require. In this case, the SQS.
Setting up IRSA is done with a script I created called ./kubernetes/setup-app-irsa.sh. It does very similar things to the KEDA version where it checks for the OIDC provider, builds a service account, and then creates a role.
The next piece of the puzzle is to configure some environment variables so that my deployment resources are more dynamic. That script is called ./scripts/configure-manifests.sh. The SQS has an ARN and a QueueURL that I didn’t want to embed in the final solution so this step squares that way before deploying.
And lastly, running kubectl apply -f kubernetes/keda-service/ will launch all of the resources required to run. Let’s take a quick tour.
Deployment
I won’t dive through all the resources but just point out highlights that I think are important. For the deployment, the spec section has my service account I created, the Docker image (which I’ve prebuilt and published), and ConfigMap which holds some environment variables that help me configure the service.
spec:
  serviceAccountName: sqs-processor-sa
  containers:
  - name: sqs-processor
    image: public.ecr.aws/f8u4w2p3/rust-sqs-processor:1.0.0
    imagePullPolicy: IfNotPresent
    envFrom:
    - configMapRef:
        name: sqs-processor-config
This article is more about KEDA than it is the Rust code, but I do want to show that my Rust code is going to poll and print what it finds. The Rust code has an infinite loop that waits for signals that pod is being terminated. It also includes a server that has a healthcheck that Kubernetes can poll to make sure the container is still responding correctly.
let receive_result = self
    .client
    .receive_message()
    .queue_url(&self.config.queue_url)
    .max_number_of_messages(self.config.max_messages)
    .wait_time_seconds(self.config.wait_time_seconds)
    .visibility_timeout(self.config.visibility_timeout)
    .send()
    .await
    .context("Failed to receive messages from SQS")?;

let messages = receive_result
    .messages()
    .unwrap_or_default()
    .iter()
    .map(|msg| Message::from(msg.clone()))
    .collect::<Vec<Message>>();

info!("Received {} messages from SQS", messages.len());
KEDA Configuration
Configuring KEDA for this deployment is done through a TriggerAuthentication and ScaledObject resource.
The TriggerAuthentication expresses that KEDA when watching the resource (SQS) to scale will use the pod’s identity, which is done with IRSA and the role I defined early up.
apiVersion: keda.sh/v1alpha1
kind: TriggerAuthentication
metadata:
  name: aws-pod-identity
  namespace: default
spec:
  podIdentity:
    provider: aws-eks
This resource pairs with the ScaledObject to give KEDA the authority and configuration it needs. This is the full spec. I am required to provide a namespace and then some other values in the spec. Notice i can cap the replicas, how many messages each pod can handle, how long to wait before scaling down, and then specifics about the SQS and AWS itself.
apiVersion: keda.sh/v1alpha1
kind: ScaledObject
metadata:
  name: sqs-processor-scaler
  namespace: default
spec:
  scaleTargetRef:
    name: sqs-processor  # Name of the deployment to scale
  minReplicaCount: 0     # Minimum number of replicas
  maxReplicaCount: 10    # Maximum number of replicas
  pollingInterval: 15    # How frequently to check the metrics (in seconds)
  cooldownPeriod: 300    # Period to wait after last trigger before scaling down
  triggers:
  - type: aws-sqs-queue
    metadata:
      queueURL: https://sqs.us-west-2.amazonaws.com/{AWS_ACCOUNT_ID}/sqs-processor-queue  # Replace with your SQS queue URL
      queueLength: "5"   # Target messages per pod
      awsRegion: "us-west-2"  # Replace with your AWS region
      identityOwner: "pod"  # Use IAM role attached to the application pod's service account
    authenticationRef:
      name: aws-pod-identity  # Reference to the TriggerAuthentication resource
Testing the Solution
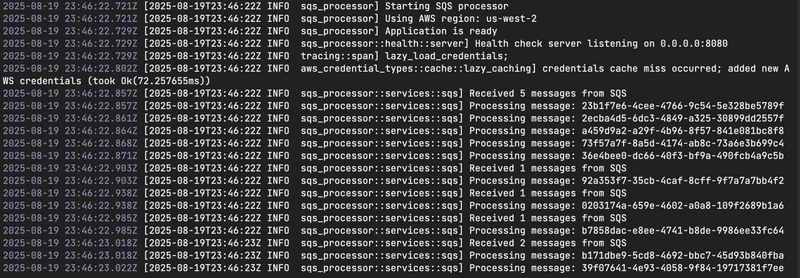
Everything is installed, deployed, and configured at this point and now it’s time to test things out. Fortunately, I asked Claude Code to build me a test script that publishes messages onto my SQS for my pod(s) to pick up and process.
I’m going to make that happen like this:
./scripts/send-test-messages.sh
I now wait 15 seconds (because that’s what I configured in my ScaledObject) to get my new pod and see what happens.

My pod appeared, worked the queue, and then shut itself down. Pretty neat and not that hard to put together!
Wrapping Up
This is a great stopping point for you to pick up and extend and take further. It’s also good building block should you want to explore other scalers. But if this is the end of your journey for now, make sure to clean up your resources and save some $$$.
./scripts/cleanup-resources.sh
Now that everything has been destroyed, I feel like this literally is barely scratching the surface on what you can do with KEDA. One of my favorite ways to use Lambda functions is for event-driven processing. However, if your team is heavily invested in Kubernetes and/or containers, this is a nice alternative and perhaps the first thing you reach for instead of Lambda in the future. Additionally, you can replace the traditional HPA metrics for scaling your pods that are always on. For instance, use KEDA to grow your replicas running an API based upon a metric that you are tracking in Prometheus or Datadog perhaps. It doesn’t have to be “events” in the asynchronous way, it can be other metrics that trigger an event. Again, barely scratching the surface.
I’ve been writing more about Kubernetes lately and expect that to continue over the coming months. I could even make this solution “serverless” by running it on Fargate as opposed to a dedicated node pool. Again, the options and the flexibility that Kubernetes gives me is highly appealing and I know that many who work primarily in the serverless world often shy away from it due to complexity. And I know that many in the Kubernetes world shy away from serverless due to lack of control and vendor lock in. Both can be true, but as a developer and a builder, having more tools on your belt gives you more ways to bring value to your customers. I also find Kubernetes allows me to utilize the Linux and Networking skills that I’ve acquired and honed throughout the years which provides a great base for better understanding how and when to apply serverless technologies.
With all that said, I hope you’ve enjoyed the article and see how you can build Event-Driven applications with KEDA and EKS.
Thanks for reading and happy building!