Managing resources efficiently is probably what Rails is best known for and what made it so revolutionary in the first place.
However, building an admin panel involves writing a lot of repetitive and boilerplate code which doesn’t really add a lot of value but is needed to manage resources with a good user experience.
Join me to learn how to build a Rails admin panel for a booking application using Avo, a gem that can help us with resource management with the most common features.
What we will build
For this application, we will build a booking application where users can find a list of properties that can be booked for vacation stays.
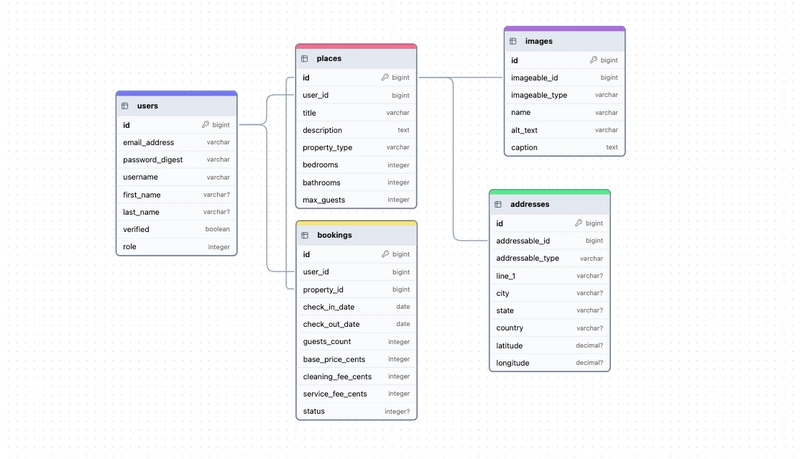
The data model for our example app will look like this:

In this application, users will be able to create accounts, navigate through a feed of places that are available for booking, see the details page and book the place.
For the tutorial, we will focus on the admin panel experience but the final result should look like this:
TODO: Final result video
Application setup
Let’s start by creating a new Rails application:
rails new vacation_booking --database=postgresql --css=tailwind --javascript=esbuild
Now, let’s start by adding Avo and installing it:
bundle add avo && bundle install
This will install Avo and some other dependencies like ViewComponent and Pagy.
The next step is to run Avo’s installer:
bin/rails generate avo:install
This command mounts the routes for Avo in the routes.rb file and adds an avo.rb initializer that we can use to customize how the library works.
With Avo installed, let’s create our database:
bin/rails db:create
Now, we can visit /avo and we should see the following:

We’re ready to go on and start building our application:
Authentication
To keep things simple we will add authentication with the Rails auth generator:
bin/rails generate authentication
This will generate a User along with a db-backed Session model and a Current class to provide us with access to the session globally.
It also adds a create_users migration that we modify with the following:
class CreateUsers < ActiveRecord::Migration[8.0]
  def change
    create_table :users do |t|
      t.string :email_address, null: false
      t.string :password_digest, null: false
      t.string :username, null: false
      t.string :first_name
      t.string :last_name
      t.integer :role, null: false, default: 0

      t.timestamps
    end
    add_index :users, :email_address, unique: true
    add_index :users, :username, unique: true
  end
end
Then, we run the migration:
bin/rails db:migrate
The next step is to add a way for users to sign up to our application. Let’s start by adding the routes and the appropriate controller code:
# config/routes.rb
Rails.application.routes.draw do
  mount_avo
  resources :registrations, only: [:new, :create]
  resource :session
  resources :passwords, param: :token
end
Then, in the controller:
class RegistrationsController < ApplicationController
  allow_unauthenticated_access only: %i[ new create ]

  def new
    @user = User.new
  end

  def create
    @user = User.new(user_params)

    if @user.save
      start_new_session_for @user
      redirect_to root_path, notice: "Welcome! Your account has been created."
    else
      render :new, status: :unprocessable_entity
    end
  end

  private

  def user_params
    params.require(:user).permit(:email_address, :username, :password, :password_confirmation)
  end
end
After styling the sign-in views created by Rails and adding the registration view, we have authentication:

Now, we can add a User resource with Avo to manage the users in our admin panel.
To achieve this, let’s use the Avo manual install command:
bin/rails generate avo:resource user
This will pick the fields from the model itself and generate them accordingly:

And, just like that we get a nice-looking admin interface for our users where we can perform CRUD operations without the need for any further configuration.
Now, let’s work on the Place resource:
Place Resource
Avo automatically adds a resource for the admin panel when we create a resource using the Rails console.
Let’s start by creating the Address model that every place will be associated with:
bin/rails generate model Address addressable:references{polymorphic} line_1 city state country latitude:decimal longitude:decimal
We modify the migration to improve consistency:
class CreateAddresses < ActiveRecord::Migration[8.0]
  def change
    create_table :addresses do |t|
      t.references :addressable, polymorphic: true, null: false
      t.string :line_1, null: false
      t.string :city, null: false
      t.string :state, null: false
      t.string :country, null: false
      t.decimal :latitude, precision: 10, scale: 6
      t.decimal :longitude, precision: 10, scale: 6

      t.timestamps
    end
  end
end
We run the migration:
bin/rails db:migrate
If we navigate to /avo/addresses we should see the index view:

Avo has a country field that we can use to pick from a list of countries but we need to install the countries gem for it to work so let’s install it:
bundle add countries && bundle install
Now, if we visit /avo/addresses/new we should see the following:

The addressable association is set as a text field by default, we will change that later after creating the Place resource.
Now, let’s add the Image model that will use Active Storage:
bin/rails active_storage:install
bin/rails generate model Image imageable:references{polymorphic} name alt_text caption:text
We then run the migrations:
bin/rails db:migrate
This will generate the model and the Avo resource for the Image model that we will be using further on.
With this in place, let’s generate the Place resource which is the actual listing that users will explore and book to spend their vacations on:
bin/rails generate model Place user:references title description:text property_type:string bedrooms:integer bathrooms:integer max_guests:integer
To improve this, we have to edit the migration a bit to make sure that we enforce our validations at the database level and add an index to the title field which might be used later on for search:
class CreatePlaces < ActiveRecord::Migration[8.0]
  def change
    create_table :places do |t|
      t.references :user, null: false, foreign_key: true
      t.string :title, null: false
      t.text :description
      t.string :property_type, null: false
      t.integer :bedrooms, null: false, default: 1
      t.integer :bathrooms, null: false, default: 1
      t.integer :max_guests, null: false, default: 1

      t.timestamps
    end

    add_index :places, :title
  end
end
Now, let’s modify the Avo resource to use a WYSIWYG editor for the description field so the user can format the text as desired and also to limit the values a user can enter in the property_type field:
class Avo::Resources::Place < Avo::BaseResource
  def fields
    field :id, as: :id
    field :user, as: :belongs_to
    field :title, as: :text
    field :images, as: :has_many
    field :description, as: :rhino
    field :property_type, as: :select, options: Place::PROPERTY_TYPES
    field :bedrooms, as: :number
    field :bathrooms, as: :number
    field :max_guests, as: :number
  end
end
We only changed the description and property_type field types to use rhino and select respectively.
Now, we add the PROPERTY_TYPES constant to the Place model:
class Place < ApplicationRecord
  PROPERTY_TYPES = {
    'Apartment': 'apartment',
    'House': 'house',
    'Townhouse': 'townhouse',
    'Condo': 'condo'
  }
end
Now, if we go to places/new we should see something like this:

Now that we have a Place resource, let’s get back to editing the Address so we can assign an address to a Place. To achieve this we need to add the field type to use a belongs_to:
class Avo::Resources::Address < Avo::BaseResource
  def fields
    field :addressable, as: :belongs_to, polymorphic_as: :addressable, types: [User, Place]
  end
end
If we go to the address form again, we should be able to associate an address with a Place:

Booking resource
Now, we need to create the Booking model which represents a relation between a user and a Place for a set amount of time and with a given set of conditions.
As we have to keep track of money with the base_price, cleaning_fee and service_fee columns, let’s start by installing the money-rails gem along with the avo-money_field:
bundle add money-rails avo-money_field && bundle install
Now, let’s create the model, please note that the monetizable fields include a corresponding currency field:
bin/rails generate model Booking user:references place:references check_in_at:datetime check_out_at:datetime guests_count:integer base_price_cents:integer base_price_currency cleaning_fee_cents:integer cleanikng_fee_currency service_fee_cents:integer service_fee_currency status:integer
We slightly modify the migration:
class CreateBookings < ActiveRecord::Migration[8.0]
  def change
    create_table :bookings do |t|
      t.references :user, null: false, foreign_key: true
      t.references :place, null: false, foreign_key: true
      t.datetime :check_in_at
      t.datetime :check_out_at
      t.integer :guests_count, default: 1
      t.integer :base_price_cents, default: 0
      t.string :base_price_currency, default: 'USD'
      t.integer :cleaning_fee_cents, default: 0
      t.string :cleaning_fee_currency, default: 'USD'
      t.integer :service_fee_cents, default: 0
      t.string :service_fee_currency, default: 'USD'
      t.integer :status, default: 0

      t.timestamps
    end
  end
end
We run the migration:
bin/rails db:migrate
Then, we have to specify which methods represent money, add validations and add the status enum:
class Booking < ApplicationRecord
  belongs_to :user
  belongs_to :place

  monetize :base_price_cents, as: :base_price
  monetize :cleaning_fee_cents, as: :cleaning_fee
  monetize :service_fee_cents, as: :service_fee

  enum :status, { pending: 0, confirmed: 1, cancelled: 2 }

  validates :check_in_at, presence: true
  validates :check_out_at, presence: true
  validates :guests_count, presence: true, numericality: { greater_than: 0 }
end
Now, we need to modify the auto-generated booking.rb Avo resource:
class Avo::Resources::Booking < Avo::BaseResource
  def fields
    field :id, as: :id
    field :user, as: :belongs_to
    field :place, as: :belongs_to
    field :check_in_at, as: :date_time
    field :check_out_at, as: :date_time
    field :guests_count, as: :number
    field :base_price, as: :money, currencies: ['USD']
    field :cleaning_fee, as: :money, currencies: ['USD']
    field :service_fee, as: :money, currencies: ['USD']
    field :status, as: :select, enum: Booking.statuses
  end
end
Now, if we visit the new booking view at avo/resources/bookings/new we should see something like this:

With this, we can book places from our admin panel however, let’s dig a bit deeper into Avo and add a search feature for the Place resource:
Search
Avo comes with a nice search feature that integrates with the Ransack gem so the first thing we need to do to add a search feature is to install the gem:
bundle add ransack && bundle install
Then, we have to define what to search on using the search class method on the Place Avo resource:
class Avo::Resources::Place < Avo::BaseResource
  self.search = {
    query: -> { query.ransack(title_cont: q, description_cont: q, m: "or").result(distinct: false) }
  }
end
Here, we perform a search by calling the ransack method on our resource and search for our q string in the content of the title and description fields. The m: "or" indicates that the result query should be present in any of the fields to return a result.
Next, we need to explicitly add the allowed searchable attributes by defining a ransackable_attributes method in the Place resource:
class Place < ApplicationRecord
  # Rest of the code

  def self.ransackable_attributes(auth_object = nil)
    ["title", "description"]
  end
end
Now, we can search for places from the index view:

Beyond allowing us to add search so easily, Avo has advanced features like global search and the ability to add our custom search provider to use solutions like Elastic Search or Typesense.
Filters with Avo
A big part of admin panel experiences is allowing users to filter data so they can find what they’re looking for more quickly.
There are two types of filters with Avo: basic filters and dynamic filters.
Basic filters can be of five types: boolean, select, multiple select, text and date time.
For the sake of this tutorial, we will add a basic filter that allows us to filter places by the state they’re located at, and the property type.
To define a filter we have to create a filter file that inherits from the specific filter subclass and has a name, an options method and an apply method that performs the actual filtering:
# app/avo/filters/property_type.rb
class Avo::Filters::PropertyType < Avo::Filters::SelectFilter
  self.name = "Property Type"

  def apply(request, query, values)
    query.where(property_type: values)
  end

  def options
    {}.tap do |options|
    Place::PROPERTY_TYPES.map do |key, value|
        options[value] = key
      end
    end
  end
end
Then, we add the filter to the place Avo resource:
# app/avo/resources/place.rb
class Avo::Resources::Place < Avo::BaseResource
  # Rest of the code

  def filters
    filter Avo::Filters::PropertyType
  end
end
We can now filter the places using the property_type attribute:

Now, let’s create a filter that uses the address association to retrieve places that are located in specific states.
class Avo::Filters::StateAddress < Avo::Filters::SelectFilter
  self.name = "State"

  def apply(request, query, values)
    query.joins(:address).where(addresses: { state: values })
  end

  def options
    {}.tap do |options|
      Address.all.pluck(:state).uniq.each do |state|
        options[state] = state
      end
    end
  end
end
We then add the filter to the place resource just like we did before:
# app/avo/resources/place.rb
class Avo::Resources::Place < Avo::BaseResource
  # Rest of the code

  def filters
    filter Avo::Filters::PropertyType
    filter Avo::Filters::StateAddress
  end
end
Now we can filter by those two parameters:

Dashboard and cards
Dashboards for data visualization are a common requirement for admin panels.
Adding them with Avo is pretty straightforward. Let’s add a dashboard with a couple of cards to demonstrate this.
The first step is to create the dashboard using the command line:
bin/rails g avo:dashboard main_dashboard
A dashboard can contain main cards so let’s add a couple to show how many users and places we have in our application.
class Avo::Dashboards::MainDashboard < Avo::Dashboards::BaseDashboard
  self.id = 'main_dashboard'
  self.name = 'Main'
  self.description = 'Main dashboard for AvoPlaces'

  def cards
    card Avo::Cards::UserCount
    card Avo::Cards::PlaceCount
  end
end
| 💡 Card Types |
|---|
| There are three types of cards that we can create with Avo: partial which uses a custom partial, metric which let’s us display data in a concise manner and the Chartkick card which is used to display charts using the Chartkick gem. |
Now let’s create the UserCount card:
class Avo::Cards::UserCount < Avo::Cards::MetricCard
end
Summary
Admin panels are a requirement for most Rails applications. They’re a must to handle resources