In our previous guides, we created Deployments using the imperative way.
Now, let’s switch gears and explore the declarative approach using YAML manifests.
This is the production-grade approach, as it ensures configurations are version-controlled, reusable, and consistent.
📌 Step 01: Copy Templates from ReplicaSet
We’ll start by deleting any existing deployments/services, then create a fresh Deployment and Service using YAML definitions.
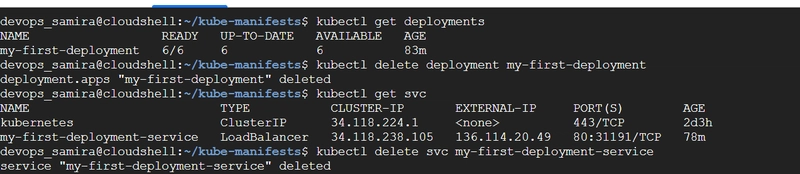
🔹 Delete Existing Deployment and Service
kubectl get deployments
kubectl delete deployment my-first-deployment

kubectl get svc
kubectl delete svc my-first-deployment-service

🔹 Create a Deployment Manifest
We’ll create a Deployment definition by modifying our earlier ReplicaSet template.
Changes made:
- kind: Deployment instead of ReplicaSet
- Image version updated to 3.0.0
- All labels/selectors updated to myapp3
📄 01-deployment-definition.yml
apiVersion: apps/v1
kind: Deployment
metadata:
  name: myapp3-deployment
spec:
  replicas: 3
  selector:
    matchLabels:
      app: myapp3
  template:
    metadata:
      name: myapp3-pod
      labels:
        app: myapp3
    spec:
      containers:
        - name: myapp3-container
          image: ghcr.io/stacksimplify/kubenginx:3.0.0
          ports:
            - containerPort: 80
🔹 Apply Deployment
# Change Directory
cd kube-manifests

# Apply Deployment
kubectl apply -f 01-deployment-definition.yml

# Verify Deployment
kubectl get deploy
kubectl get rs
kubectl get po

🔹 Create a LoadBalancer Service
Now let’s expose our Deployment externally using a LoadBalancer Service.
📄 02-deployment-LoadBalancer-service.yml
apiVersion: v1
kind: Service
metadata:
  name: deployment-loadbalancer-service
spec:
  type: LoadBalancer
  selector:
    app: myapp3
  ports:
    - name: http
      port: 80       # Service Port
      targetPort: 80 # Container Port
🔹 Apply Service
kubectl apply -f 02-deployment-LoadBalancer-service.yml

# List Services
kubectl get svc

# Get Public IP (assigned by GCP LoadBalancer)
kubectl get nodes -o wide

# Access Application
http://

✅ Now you should see Application Version: 3.0.0 served through your GCP LoadBalancer.

📌 Step 02: Clean-Up Kubernetes Deployment and Service
Once done testing, let’s clean up the resources.
# Delete Deployment
kubectl delete -f 01-deployment-definition.yml

# Delete LoadBalancer Service
kubectl delete -f 02-deployment-LoadBalancer-service.yml

✅ Recap
In this guide, we:
- Converted a ReplicaSet template into a Deployment manifest
- Exposed it using a LoadBalancer Service in GCP
- Verified our application running with 3 replicas
- Cleaned up resources after testing
👉 Declarative manifests are the best practice for Kubernetes because they enable repeatability, GitOps workflows, and team collaboration.
🌟 Thanks for reading! If this post added value, a like ❤️, follow, or share would encourage me to keep creating more content.
— Latchu | Senior DevOps & Cloud Engineer
☁️ AWS | GCP | ☸️ Kubernetes | 🔐 Security | ⚡ Automation
📌 Sharing hands-on guides, best practices & real-world cloud solutions