I’m still exploring and learning SpecKit. If you spot anything incorrect, have suggestions, or know a better way of doing things, please feel free to share your thoughts in the comments.
The “why”
I was exploring some simple projects to build with copilot. An expense tracker seemed straightforward, but I wanted to avoid the usual pitfalls of unclear requirements, scope creep, and endless refactoring by just starting with a large prompt. Instead of jumping straight into code, I tried Spec-Driven Development with GitHub’s SpecKit.
Why SpecKit Works
Previous development with AI: “I need an expense tracker” (with some details) → starts coding → unclear requirements → endless refactoring → ships something that kinda works.
SpecKit flips this: specifications become executable blueprints. You have a conversation with your future code before writing a single line.
The 5-Step Workflow
-
📋
/constitution– Set project principles (quality, testing, UX) -
🎯
/specify– Define what you’re building (what/why, not how) -
🗺️
/plan– Choose tech stack and architecture -
✅
/tasks– Generate actionable task lists -
⚡
/implement– Execute tasks according to spec
Each step validates the previous one, catching issues before they become expensive code problems.
My Development Journey
Step 1: Constitution
I established non-negotiable principles:
- TypeScript strict mode + 80% test coverage
- Consistent UX with clear error messages
- Minimal dependencies + comprehensive docs
- Test-first development (TDD)
These became automated quality gates for every piece of code.


Step 2: Specification
I focused on user value, not tech choices:
“Users record income/expenses, categorize spending, view monthly summaries, get spending limit alerts, recurring bill reminders, and anomaly detection for unusual transactions.”
Result: 16 specific, testable requirements in business-friendly language.
Step 3: Tech Planning
Only after requirements were clear did I choose my stack:
- Frontend: React 19 + TypeScript + Vite
- Backend: NestJS + SQLite + TypeORM
- Auth: JWT with Node.js and native crypto
- Charts: Nivo for interactive visualizations

SpecKit generated: 7 entities, 16 API endpoints, 39 numbered tasks.
Step 4: Task Execution
SpecKit broke everything into executable chunks:
✅ T001-T008: Project setup & config
✅ T009-T023: Tests first (TDD)
✅ T024-T031: Database & models
✅ T032-T045: Backend APIs
✅ T046-T055: Frontend components
🔄 T056-T077: Polish & optimizations
Key insight: Tests before implementation caught edge cases early.
What I Shipped
Features Built
- JWT Authentication with secure login/register
- Transaction CRUD with smart categorization
- Budget Tracking with real-time progress bars
- Interactive Charts showing spending trends
- Anomaly Detection flagging unusual spending ($500 groceries vs usual $300)
- Monthly Reports with actionable financial insights
Technical Results
- Full TypeScript end-to-end type safety
- Modern Stack React 19, NestJS, latest tooling
Why This Approach Won
Quality Gates Prevent Debt: Constitutional principles meant no “fix it later” code reached production.
Test-First Actually Works: Writing failing tests first caught edge cases I’d never have thought of.
Faster Development: More upfront planning = less refactoring, clearer decisions, fewer “what am I building?” moments.
Challenges Faced
I did face a few issues with the initial setup, and some AI-generated code needed tweaking, but overall the process was smooth. As we updated tasks during implementation, SpecKit kept everything aligned. We could start with fresh context and still have the full history of decisions.
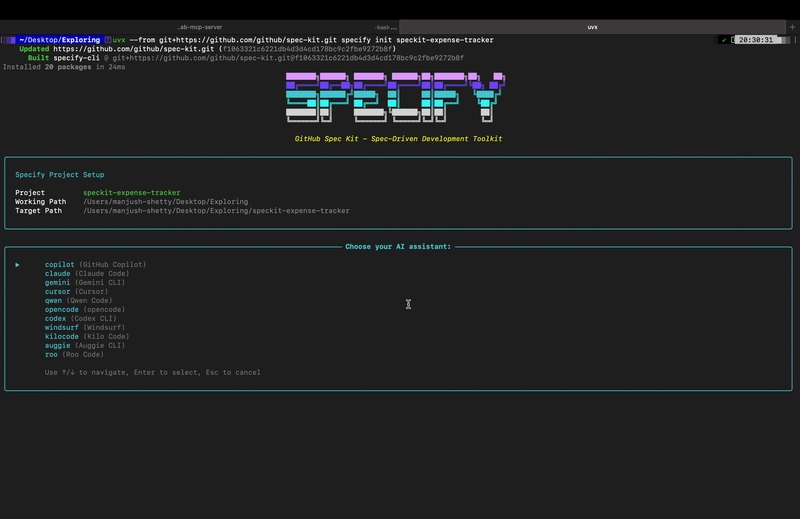
Try SpecKit Yourself
# Install SpecKit
uv tool install specify-cli --from git+https://github.com/github/spec-kit.git

# Initialize project
specify init my-app --ai copilot

# Follow the workflow
/constitution  # Set principles
/specify       # Define requirements
/plan          # Choose tech stack
/tasks         # Generate tasks
/implement     # Build it!
🔗 Links & Resources
Built something cool with SpecKit? I’d love to hear about your experience! Share your projects and lessons learned in the comments below.