AWS Builder Challenge #2 submission showcasing what’s possible when you push beyond the requirements
The Strategic Skip: Why I Started from Day 4
As an experienced software engineer, I’ll be honest—I almost skipped the AWS Builder Challenge entirely. “Build a personal website” seemed like another “Hello World” tutorial. But then I read the fine print: 7 days, Free Tier only, make it your own.
That’s when it clicked. This wasn’t about following instructions—it was about taking constraints and building something remarkable within them. You can check it out here before diving into the article.
The Complete 7-Day Journey
The full challenge provides a comprehensive introduction to cloud development:
-
Day 1: Secure Foundation – AWS Free Tier setup, MFA, IAM users, budget alerts
-
Day 2: Private Cloud Storage – S3 bucket creation with security best practices
-
Day 3: Web Content – HTML/CSS development, customizing templates, secure uploads
-
Day 4: Global Distribution – CloudFront CDN, solving the distance problem
-
Day 5: Professional Deployment – GitHub integration, Amplify deployment automation
-
Day 6: Secure Contact Form – Serverless contact forms with Lambda + SES
-
Day 7: Share your success – Writing and sharing your experience
I strategically skipped Days 1-4 since I already had AWS experience with these services. Days 1-3 covered account setup, S3, and static HTML – all foundational but familiar territory. Day 4’s CloudFront was also something I’d implemented many times through CDK for other projects.
Instead, I jumped straight to Day 5 where things got interesting: modern deployment pipelines with Amplify.
For beginners, the first four days provide excellent foundations in AWS security, storage, web development, and global distribution. Don’t skip them unless you’re already comfortable with these concepts.
The Real Challenge: From Static to Interactive
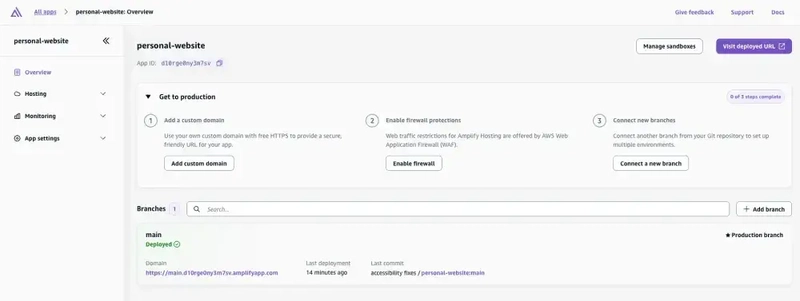
Day 5: CI/CD with GitHub and Amplify – The New Territory
This is where the challenge got practical. Setting up GitHub integration with AWS Amplify through the console taught me something valuable: modern deployment pipelines should be boring.
The magic happens when you push code and everything just… works:
-
GitHub repository integration through the Amplify console
-
Automatic deployments triggered by every commit to main branch
-
Zero configuration – Amplify auto-detected my static HTML site
-
Built-in CDN – Same CloudFront performance, but managed automatically
-
HTTPS by default – No certificate management needed
The setup process was surprisingly straightforward:
- “Deploy an app” in Amplify console
- Connect GitHub repository with OAuth authorization
- Auto-detect build settings (no amplify.yml needed for static sites)
- Deploy and get instant HTTPS URL
Within minutes, I had the same global performance as my manual CloudFront setup, but with automatic deployments and a cleaner workflow.

Day 6: Interactive Contact Form – The Reality Check
Building a serverless contact form sounds simple until you consider:
- Input validation and sanitization
- Rate limiting and spam protection
- Email delivery reliability
- Error handling and user feedback
- Accessibility compliance
I used AWS Lambda + SNS with the exact code provided in the challenge. Rather than reinventing the wheel, I followed the tutorial’s implementation:
// Exact Lambda function code from Day 6 challenge
import json
import boto3

def lambda_handler(event, context):
    try:
        # Parse the form data from the request
        body = json.loads(event['body'])
        name = body.get('name', '')
        email = body.get('email', '')
        message = body.get('message', '')

        # Validate that all required fields are present
        if not all([name, email, message]):
            return {
                'statusCode': 400,
                'body': json.dumps({'error': 'Missing required fields'})
            }

        # Format the notification message
        notification_message = f"""Contact Form Submission

Name: {name}
Email: {email}

Message:
{message}"""

        # Send notification via SNS
        sns = boto3.client('sns')
        sns.publish(
            TopicArn='arn:aws:sns:us-east-1:123456789012:contact-form-notifications',
            Subject=f'Contact Form: {name}',
            Message=notification_message
        )

        # Return success response
        return {
            'statusCode': 200,
            'body': json.dumps({'message': 'Message sent successfully!'})
        }

    except Exception as e:
        # Return error response if anything goes wrong
        return {
            'statusCode': 500,
            'body': json.dumps({'error': 'Failed to send message'})
        }
The beauty was in its simplicity – the challenge provided a working solution that I could deploy immediately.


Beyond the Challenge: Building a Production Portfolio
Before diving into the AI innovation, let me showcase what I actually built as the foundation. While the challenge provided basic HTML templates, I went completely custom to create a production-ready portfolio that demonstrates serious frontend skills.
The Kiro Advantage: Spec-Driven Development
Here’s where I have to give credit where it’s due – Kiro IDE’s spec-driven workflow was instrumental in transforming the basic AWS challenge template into something production-ready.
Instead of just “customizing” the provided HTML template, I used Kiro to architect a complete system.
What Kiro Generated:
- 7 detailed user stories with acceptance criteria (from “understand who Karthik is” to “chat with AI version”)
- Complete design system including dark theme color palettes, typography scales, and component specifications
- 17-step implementation plan systematically transforming basic template to production portfolio
- Data architecture with structured models for experience, projects, skills, and certifications
From the actual Kiro requirements spec:
“This project involves creating an elegant, minimalist personal website for Karthik Subramanian, a Principal-level Software Engineer who excels in backend development but can also build beautiful frontend web applications. The website should be streamlined, to-the-point, and use a dark theme with scroll-based discovery instead of traditional navigation.”

The Spec-Driven Transformation:
Rather than ad-hoc customization, Kiro mapped out systematic requirements like:
- Requirement 3: “I want the website to demonstrate Karthik’s frontend development skills through elegant design and smooth interactions”
- Requirement 7: “I want to chat with an AI version of Karthik, so that I can have interactive conversations about his experience”
- Each requirement came with detailed acceptance criteria and was mapped to specific implementation tasks. This meant every design decision was intentional and measurable.
The Result: What could have been a simple template customization became a comprehensive design system with proper color schemes, responsive breakpoints, accessibility standards, and even AI integration specifications.
This is the power of specification-driven development – instead of “making it look nice,” I had a clear architectural plan that transformed a basic challenge template into a sophisticated portfolio platform.


Ofcourse it wasn’t all AI generated, like my spanky new profile says –
“Master of AI diplomatic relations – can negotiate with AI to produce clean, deployable code with strategic prompt engineering.”
Professional Design Architecture
Instead of using the basic template, I built a fully custom dark-theme portfolio with sophisticated visual design:
- Cohesive dark color scheme using CSS custom properties for maintainability
- Professional typography with Inter and JetBrains Mono fonts
- Gradient backgrounds and subtle patterns throughout
- Comprehensive hover animations and micro-interactions
- Custom scrollbar styling for consistent branding
Accessibility-First Implementation
This wasn’t just about making it “look good” – I implemented WCAG AA compliance from the ground up:
// Real accessibility features from my accessibility-enhancements.js
class AccessibilityEnhancer {
    setupKeyboardDetection() {
        document.addEventListener('keydown', (e) => {
            if (e.key === 'Tab') {
                this.isKeyboardUser = true;
                document.body.classList.add('keyboard-navigation-active');
            }
        });
    }

    updateCurrentSection(section) {
        if (this.currentSection) {
            this.currentSection.removeAttribute('aria-current');
        }
        this.currentSection = section;
        section.setAttribute('aria-current', 'location');

        const sectionName = this.getSectionName(section);
        if (sectionName && this.isKeyboardUser) {
            this.announce(`Now viewing ${sectionName} section`);
        }
    }
}
Features implemented:
- Skip navigation links with proper focus management
- Screen reader announcements via ARIA live regions
- Keyboard navigation detection and enhanced focus styles
- Section tracking with aria-current for screen readers
- Keyboard shortcuts (Alt + 1-6 for sections, Alt + H for home)
- High contrast mode support for Windows accessibility
- Reduced motion preferences respected throughout
Mobile-First Responsive Design
Built with mobile-first methodology and comprehensive breakpoint strategy:
/* Mobile-first responsive implementation from main.css */
@media (max-width: 640px) {
    .text-5xl { font-size: 2.25rem !important; }
    .py-20 { padding-top: 3rem !important; padding-bottom: 3rem !important; }

    /* Touch-friendly targets */
    a, button, [role="button"] {
        min-height: 48px;
        min-width: 48px;
        padding: 0.75rem;
    }
}

@media (min-width: 1025px) {
    .text-5xl { font-size: 3.5rem; }
    .hero-content { max-width: 1024px; }
}
Responsive features implemented:
- Dynamic responsive classes – JavaScript adds mobile/tablet/desktop/large-desktop classes
- Touch device detection with appropriate UI adjustments
- Progressive typography scaling across all breakpoints
- Content layout optimization for different screen sizes
- Touch-friendly interface elements (minimum 44px targets)
Performance Optimizations
Every optimization implemented for Free Tier efficiency:
/* Performance optimizations from main.css */
.animate-on-scroll {
    will-change: transform, opacity;
    backface-visibility: hidden;
    perspective: 1000px;
}

.animation-complete {
    will-change: auto; /* Remove after animation for performance */
}

img {
    max-width: 100%;
    height: auto;
    aspect-ratio: attr(width) / attr(height); /* Prevent layout shift */
}
Performance features:
- Image lazy loading with Intersection Observer
- Animation performance optimizations using will-change and backface-visibility
- Reduced animations on mobile to preserve battery life
- CSS containment for better rendering performance
- Font loading optimization with preconnect hints
- Smooth scrolling with proper scroll-padding
Advanced UX Features
Interactive elements that enhance the user experience:
// Real scroll progress indicator from animations.js
function initScrollProgressIndicator() {
    const progressBar = document.createElement('div');
    progressBar.className="fixed top-0 left-0 h-1 bg-blue-400 z-50";
    progressBar.setAttribute('role', 'progressbar');
    progressBar.setAttribute('aria-label', 'Page scroll progress');

    function updateScrollProgress() {
        const scrollTop = window.scrollY;
        const scrollHeight = document.documentElement.scrollHeight - window.innerHeight;
        const scrollPercent = Math.min(100, Math.max(0, (scrollTop / scrollHeight) * 100));

        progressBar.style.width = `${scrollPercent}%`;
        progressBar.setAttribute('aria-valuenow', Math.round(scrollPercent));
    }

    window.addEventListener('scroll', requestAnimationFrame(updateScrollProgress));
}
Features implemented:
- Scroll progress indicator with ARIA progressbar role for accessibility
- Word rotation animation in hero tagline with layout shift prevention
- Intersection Observer animations with staggered delays and performance cleanup
- Interactive skills switching with keyboard navigation and ARIA states
- Timeline animations for experience section with hover effects
- Email template functionality – right-click on email links for quick templates
- Touch device optimization with appropriate target sizes and feedback
- Loading states and visual feedback for all interactive elements
Don’t believe me? You can open devtools on the site and head over to the Lighthouse tab and kick off a new analysis. Here is the result from the last one I ran –

The Unique Twist: Local AI Chat Integration
Here’s where I went completely off-script. The challenge wanted a personal website, but I thought: What if visitors could actually chat with an AI version of me?

Why Chrome’s Built-in AI?
- Most AI implementations require:
- External API calls (costs money)
- Server-side processing (not Free Tier friendly)
- Complex authentication (user friction)
Chrome’s Gemini Nano runs entirely in the browser. Zero cost. Zero servers. Maximum privacy.
// Real AI detection code from my ai-manager.js
async detectAICapabilities() {
    this.log('🔍 Detecting AI capabilities...');

    try {
        if (typeof LanguageModel === 'undefined') {
            this.log('❌ LanguageModel API not available');
            this.logSetupInstructions();
            return false;
        }

        this.log('✅ LanguageModel API found');

        // Check availability
        const availability = await LanguageModel.availability();
        this.log('📊 AI availability:', availability);

        // Store capabilities
        this.capabilities = { available: availability };

        // Set appropriate state
        switch (availability) {
            case 'available':
                this.setState('available');
                return true;
            case 'downloadable':
                this.setState('downloadable');
                return true;
            case 'downloading':
                this.setState('downloading');
                this.startAvailabilityPolling();
                return true;
            case 'unavailable':
                this.setState('unavailable');
                return false;
            default:
                this.log('❌ Unknown availability status:', availability);
                this.setState('unavailable');
                return false;
        }

    } catch (error) {
        this.log('❌ Error detecting AI capabilities:', error);
        return false;
    }
}
The Technical Implementation Challenge
The real challenge was managing different AI states and providing appropriate UI feedback:
// Real state management from ai-manager.js
updateTeaserUI() {
    const teaserText = document.getElementById('ai-teaser-inline-text');
    const detectionLoading = document.getElementById('ai-detection-loading');
    const downloadingIndicator = document.getElementById('ai-downloading-indicator');
    const downloadBtn = document.getElementById('ai-download-btn');
    const chatReadyBtn = document.getElementById('ai-chat-ready-btn');

    if (!teaserText) return;

    // Update text message
    teaserText.textContent = this.getStateMessage();

    // Update indicators based on state
    this.hideElement(detectionLoading);
    this.hideElement(downloadingIndicator);
    this.hideElement(downloadBtn);
    this.hideElement(chatReadyBtn);

    switch (this.state) {
        case 'checking':
            this.showElement(detectionLoading);
            break;
        case 'downloadable':
            this.showElement(downloadBtn);
            break;
        case 'downloading':
            this.showElement(downloadingIndicator);
            break;
        case 'available':
            this.showElement(chatReadyBtn);
            break;
    }
}
The hardest part was getting the prompt to be both accurate and comprehensive. My solution: dynamic prompts built from real profile data:
// Real dynamic prompt system from ai-chat-interface.js
buildSystemPrompt() {
    const now = new Date();
    const currentDateTime = now.toLocaleString('en-US', {
        weekday: 'long', year: 'numeric', month: 'long', day: 'numeric',
        hour: '2-digit', minute: '2-digit', timeZoneName: 'short'
    });

    // Get data from global data.js variables - this is the key insight
    const personalData = typeof personalInfo !== 'undefined' ? personalInfo : {};
    const experienceData = typeof experience !== 'undefined' ? experience : [];
    const projectsData = typeof projects !== 'undefined' ? projects : [];
    const skillsData = typeof skills !== 'undefined' ? skills : {};

    return `You are Karthik Subramanian, responding in first person as yourself.

CURRENT CONTEXT:
- Current date and time: ${currentDateTime}
- You are responding to someone visiting your personal portfolio website

PERSONAL INFORMATION:
- Name: ${personalData.name || 'Karthik Subramanian'}
- Title: ${personalData.title || 'Senior Software Engineering Manager'}
- Current Company: Scholastic Inc.
- Bio: ${personalData.bio || ''}

PROFESSIONAL EXPERIENCE:
${experienceData.map(job =>
    `- ${job.position} at ${job.company} (${job.duration})
  ${job.description}
  Key achievements: ${job.achievements?.join(', ') || ''}
  Technologies: ${job.technologies?.join(', ') || ''}`
).join('\n\n')}

FEATURED PROJECTS:
${projectsData.filter(p => p.featured).map(project =>
    `- ${project.title}: ${project.description}
  Technologies: ${project.technologies?.join(', ') || ''}
  ${project.liveUrl ? `Live: ${project.liveUrl}` : ''}
  ${project.githubUrl ? `GitHub: ${project.githubUrl}` : ''}`
).join('\n\n')}

IMPORTANT GUIDELINES:
- Always respond in first person as Karthik
- Be conversational and personable, but professional
- Only provide information that is included in this profile
- If asked about something not in your profile, politely redirect
- Remember: You are Karthik having a conversation about your professional experience`;
}
Instead of hardcoded text, the AI gets live data from my profile – experience, projects, skills, even the current date for context. This means when I update my portfolio data, the AI automatically gets the latest information. Does it work well? You tell me 😉
Graceful Degradation Strategy
The AI chat is an enhancement, not a requirement.
- Site works perfectly without AI (traditional contact form and static content)
- AI features only activate when supported browser is detected
- Graceful fallback to keyword-based responses when AI session creation fails
- Clear messaging about browser requirements without breaking the experience
Production Polish: The Details That Matter
Accessibility First
The challenge didn’t mention accessibility, but it should be table stakes:
Performance Optimizations
- Free Tier means every byte counts:
- Image optimization with proper formats and sizes
- Font subsetting to load only used characters
- CSS purging with Tailwind’s production build
- JavaScript lazy loading for non-critical features
- Resource hints for better loading performance
Responsive Design Philosophy
Mobile-first, but desktop-optimized:
/* Base mobile styles */
.hero-content {
  padding: 2rem 1rem;
  text-align: center;
}

/* Progressive enhancement for larger screens */
@media (min-width: 768px) {
  .hero-content {
    padding: 4rem 2rem;
    display: grid;
    grid-template-columns: 1fr 1fr;
    align-items: center;
    text-align: left;
  }
}

@media (min-width: 1024px) {
  .hero-content {
    padding: 6rem 3rem;
    max-width: 1200px;
    margin: 0 auto;
  }
}
Key Takeaways
1. Constraints Spark Creativity
The Free Tier limitation forced innovative solutions. Local AI processing, optimized images, efficient caching—creativity born from constraints.
2. Skip Smart, Not Blindly
I skipped the basics I knew but thoroughly explored areas that were new. Day 4’s CloudFront configuration taught me more than expected.
3. User Experience > Technical Prowess
The AI chat is cool, but the site works perfectly without it. Progressive enhancement should be our default approach.
4. Modern Web Standards Matter
Accessibility, performance, and responsive design aren’t optional anymore. Build them in from day one.
5. Ship Fast, Iterate Faster
The 7-day constraint prevented perfectionism. Sometimes “good enough to ship” is exactly what you need.
The Results
The final website features:
- ⚡ Sub-2-second load times globally via CloudFront
- 🤖 Local AI chat with personality-matched responses
- ♿ WCAG AA compliance with full keyboard navigation
- 📱 Responsive design that works on any device
- 🔒 Security headers and proper HTTPS enforcement
- 📈 Performance scores of 90 on all Lighthouse metrics
Final Thoughts
The AWS Builder Challenge succeeded in ways the organizers probably didn’t expect. It wasn’t about learning AWS basics—it was about rediscovering the joy of building within constraints.
For experienced developers considering similar challenges: don’t skip them entirely. Instead, use them as opportunities to explore adjacent technologies, implement best practices you’ve been meaning to try, or push the boundaries of what’s possible within the given constraints.
The best part? Everything runs on AWS Free Tier. Zero ongoing costs for a production-ready personal site with AI capabilities.
Source Code: Available on GitHub
Live Site