Hey there, cloud conqueror! 🌟 Imagine this: You and your buddy are like digital pirates, crafting custom web apps, packaging them into sleek Docker containers, and swapping them securely across AWS accounts via Amazon ECR. No more “it works on my machine” drama – just smooth, cross-account magic!
Here’s the story-outline of our thrilling guide:
- Act 1: Setup the Stage – Install Docker, craft your app files, and build your container image locally.
- Act 2: Enter the Cloud Realm – Log into AWS with IAM, create an ECR repository, and push your image to the skies.
- Act 3: The Great Swap – Configure CLI access, tag and push like a pro, then grant permissions for your buddy to pull your masterpiece.
- Act 4: Victory Lap – Pull and run each other’s images on localhost, unlock secret codes, and celebrate the deployment win!
- Epilogue: Clean Up & Share – Delete resources to avoid charges and brag about your feat on LinkedIn.
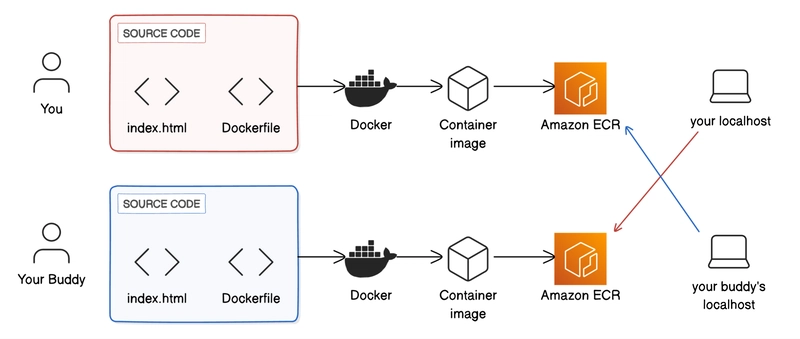
And to visualize the journey, feast your eyes on this architecture diagram:

Overview: You build from source code (index.html + Dockerfile), create Docker image, push to Amazon ECR, then your buddy pulls to their localhost. Bottom: Your buddy does the same, and you pull to your localhost. It’s a beautiful crossover!
Ready to dive in? Let’s make this multiplayer project your next triumph – step by step, with zero fluff and all the details! 💥
🛠️ Step 1: Install Docker Desktop – Your Container Powerhouse! 🐳
First things first: Get Docker up and running on your local machine. This is the tool that’ll let you build and manage containers effortlessly.
-
Download Docker Desktop: Head over to the official Docker website and select “Download Docker Desktop.” Choose the version matching your OS:
- Mac: Check “About this Mac” for Apple or Intel chip.
- Windows: Use System Information to see if it’s x64 or ARM-based.
-
Linux: Run
uname -min terminal for x86_64 or aarch64/arm64.
-
Install It:
- Mac: Drag Docker icon to Applications folder.
- Windows: Run the .exe installer (default: C:\Program Files\Docker\Docker).
- Linux: Follow your distro’s instructions.
-
Launch and Verify: Open Docker Desktop. In your terminal (Terminal on Mac/Linux, Command Prompt on Windows), run:
docker --version
You should see the version number printed – boom, you’re Docker-ready! 🎉
- Pro Tip: If prompted, grant terminal access to Docker. This ensures smooth commands ahead.
Now, chat with your buddy – make sure they’re Docker-equipped too!
📁 Step 2: Create Your Project Files – Build the Heart of Your App! ❤️
Time to craft the files for your custom web app. We’ll make a simple HTML page served by Nginx, complete with a secret code for your buddy to discover!
- Set Up Your Project Directory: In your terminal, navigate to Desktop and create a folder:
  cd ~/Desktop
  mkdir DockerECR
  cd DockerECR
This is your project’s home base.
- Create the Dockerfile: Run:
touch Dockerfile
(Windows users: Use New-Item -Path . -Name "Dockerfile" -ItemType "File" instead.)
Open it in a text editor (e.g., VS Code, Notepad++). Add:
  FROM nginx:latest
  COPY index.html /usr/share/nginx/html/
- What This Does: Starts with Nginx (a web server base image) and copies your custom HTML into it. Save with Ctrl/Command + S.
touch index.html
(Windows: New-Item -Path . -Name "index.html" -ItemType "File".)
Open and add:
![]() src="[Public Image URL]" alt="Custom Image" style="width:100%; max-width:300px;">
src="[Public Image URL]" alt="Custom Image" style="width:100%; max-width:300px;">
Replace placeholders with real details – keep the secret code hidden from your buddy! Save it.
- Test Locally: Right-click index.html in your folder, open with browser (e.g., Chrome). It should display your page flawlessly.
High-five your buddy: Explain your Dockerfile to each other for extra learning vibes! 🤝
🏗️ Step 3: Build Your Docker Container Image Locally – Package the Magic! ✨
With files ready, let’s “build” your image – turning instructions into a runnable template!
- Run the Build Command: In terminal (inside DockerECR folder):
docker build -t nextwork/cross-account-docker-app .
Watch Docker pull Nginx and assemble your image. Grant any access popups.
- Verify the Build: Open Docker Desktop > Builds tab. Your image should top the list!
- Why This Matters: Now your app is containerized – consistent anywhere it’s run.
You’re halfway to sharing – exciting, right? 😎
🔑 Step 4: Log In to AWS with IAM – Secure Your Cloud Access! 🛡️
Shift to AWS: Use IAM for safe, limited access (not root user).
-
Create IAM Admin User (If Needed): Log in as root to AWS IAM Console.
- Users > Create user. Name: [YourName]-IAM-Admin.
- Check “Provide user access to AWS Management Console.”
- Custom password (secure, memorable). Uncheck “Users must create new password.”
- Next > Attach policies directly > Search and select “AdministratorAccess.”
- Create user.
-
Log In as IAM User: Use the new credentials in AWS Management Console.
Buddy check: Ensure they’re using IAM too!
🗄️ Step 5: Create Your ECR Repository – Your Image Vault in the Cloud! ☁️
Amazon ECR stores your images securely. Let’s set one up!
- Navigate to ECR: In AWS Console, search for “ECR” > Repositories > Create repository.
- Configure: Private > Name: nextwork/cross-account-docker-app > Create.
- Why ECR?: It’s managed, private, and perfect for sharing containers across accounts.
Copy your repo URI – you’ll need it soon!
⚙️ Step 6: Set Up AWS CLI for ECR Access – Command-Line Superpowers! 💪
Enable terminal control over AWS.
-
Install AWS CLI (If Needed): Download from AWS CLI docs. Install per OS. Verify:
aws --version. -
Create IAM User for CLI: In IAM Console > Users > Create user: ECR-Access.
- Console access: No.
- Attach “AmazonEC2ContainerRegistryFullAccess.”
- Create > Download .csv with access keys.
-
Configure CLI: Run
aws configure. Enter: Access Key ID, Secret Access Key, default region (e.g., us-east-1), output: json.
Now your CLI is ECR-ready!
📤 Step 7: Push Your Image to ECR – Launch to the Cloud! 🚀
Authenticate, tag, and upload!
- Authenticate Docker to ECR: In ECR repo > View push commands. Copy/run the first:
aws ecr get-login-password --region [your-region] | docker login --username AWS --password-stdin [account-id].dkr.ecr.[region].amazonaws.com
Login succeeded? Great!
- Tag Your Image: Run the third push command (tags as “latest”).
- Push It: Run the fourth:
docker push [your-repo-uri]:latest
Refresh ECR – your image is there!
Swap repo URIs with your buddy now.
🔒 Step 8: Grant Cross-Account Permissions – Unlock the Swap! 🔓
Make your private repo accessible to your buddy.
- Update Repo Policy: In ECR > Your repo > Permissions > Edit policy JSON. Add:
  {
    "Version": "2012-10-17",
    "Statement": [
      {
        "Effect": "Allow",
        "Principal": {
          "AWS": "[Buddy's ECR-Access ARN]"
        },
        "Action": [
          "ecr:BatchCheckLayerAvailability",
          "ecr:BatchGetImage",
          "ecr:GetDownloadUrlForLayer"
        ]
      }
    ]
  }
Replace with their ARN (from IAM > Users > ECR-Access > Summary). Save.
- Buddy Does the Same: Share your ARN; they add it to their policy.
Permissions granted – time for the pull!
🏃♂️ Step 9: Pull & Run Your Buddy’s Image – The Grand Reveal! 🎊
The climax: Deploy their app locally!
- Authenticate to Their ECR: Run their first push command in your terminal.
- Pull Their Image:
docker pull [buddy's-repo-uri]:latest
docker run -d -p 80:80 [buddy's-repo-uri]:latest
(If port 80 busy, try 8080:80.)
- View It Live: Browser > localhost (or localhost:8080). See their custom page and secret code! 📸 Screenshot for memories.
Swap screenshots – you’ve both deployed across accounts! 🏆
🧹 Step 10: Clean Up Resources – Stay Charge-Free! 🆓
Avoid bills: Delete everything.
- ECR Repo: ECR > Select repo > Delete.
- IAM User: IAM > Users > ECR-Access > Delete (confirm name). Delete .csv file locally.
- Docker Resources: Docker Desktop > Containers/Images/Builds tabs > Select all > Delete forever.
Spotless!
📣 Step 11: Share Your Victory – Inspire the World! 🌍
- Document & Post: Download your project notes as PDF. Share on LinkedIn: Pre-populate post, add PDF via “Add a document.” Title it proudly!
- Celebrate: Pat yourself (and buddy) on the back – you’ve mastered cross-account deployments! What’s next? More AWS & Docker adventures! 🔥