If you’re looking to deploy powerful AI tools, you’ve likely faced a key challenge: how to unlock their full potential without compromising the security of your sensitive data.
Most platforms push everything to the cloud, which feels convenient at first but quickly raises red flags when you’re dealing with customer records, financial data, or internal IP. You want the power of multi-agent systems, but you also want privacy, control, and the ability to run everything on your own machine.
That’s where Eigent comes in.
What is Eigent?
Eigent is a local-first multi-agent desktop application. Instead of sending your data to external servers, it runs everything on your computer. You get full visibility into what’s happening and the confidence that your files, credentials, and logs stay with you.
Think of it as building your own AI workforce. You can spin up different agents, each with their own skills: a search agent that combs the web, a developer agent that runs code, a document agent that writes and edits files, and even multimodal agents that handle images and audio. Eigent coordinates them for you so they can tackle tasks in parallel, hand things off when needed, and deliver polished results.
In this guide we’re going to show you exactly how to set it up locally. By the end you’ll have Eigent running on your desktop with agents ready to work together on your terms.
Prerequisites
Before getting started, make sure you have the following in place:
- Node.js (v18 or newer) and npm: Eigent is a Node/Electron application. Install Node.js (18–22 is recommended) if you haven’t already. Tip: You can download Node from the official site or use a version manager.
- Memory and Hardware: At least 8 GB of RAM is recommended for smooth performance. Eigent can run entirely on CPU if you’re connecting to external APIs (like OpenAI or Anthropic). If you want to run large models locally on your machine, having a capable GPU (e.g. an NVIDIA RTX card) will make a big difference in speed.
- Operating System: Eigent supports local deployment on major OSes (Windows, macOS). The steps below are OS-agnostic.
- Docker: Install Docker if you haven’t already, and make sure docker is running.(Docker Installation Guide)
1. Clone the Repo & Start the PostgreSQL Backend

First, clone the Eigent repo and install its dependencies:
git clone https://github.com/eigent-ai/eigent.git
cd eigent
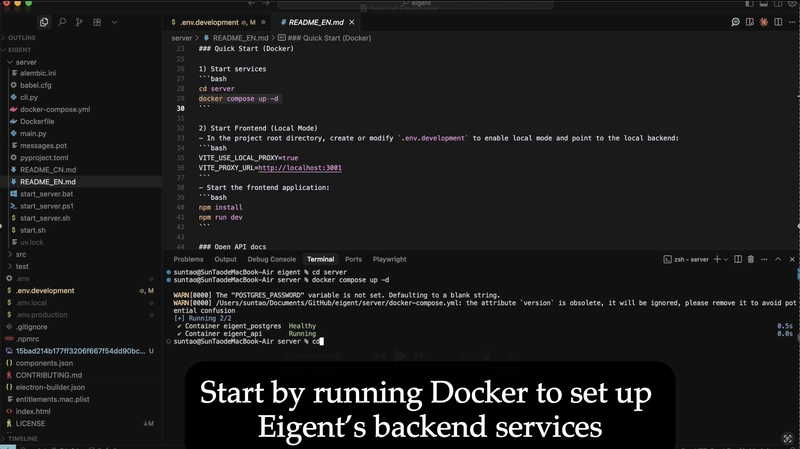
This will give you the full source code on your machine. Next, switch into the server directory and launch Docker:
cd server
# Copy .env.example to .env (or create .env according to .env.example)
cp .env.example .env
docker compose up -d
This command uses the provided docker-compose.yml to spin up two containers:
- A PostgreSQL database (the Eigent data store)
- The Eigent API server
Both run locally on your machine (e.g. localhost:3001 for the API). The screenshot above shows Docker pulling the images and starting the eigent_postgres and eigent_api containers.
Docker Compose brings up the Postgres database and API server locally.
By default, Docker will create a volume for PostgreSQL, so all database files are stored on your disk (not in memory).
2. Verify Local Data Storage
At this point, everything is running locally. The PostgreSQL container (eigent_postgres) holds the database. You can double-check by listing your Docker containers or using a tool like psql inside the container. Everything Eigent does (agent messages, user data, task logs, etc.) will be written to that local Postgres instance. No data is sent anywhere outside your machine.
All Eigent data is stored in the local Dockerized PostgreSQL database.
This ensures privacy by design. As stated in the docs, a key advantage of self-hosting is data privacy – you keep sensitive data within your own infrastructure. In fact, when you use this setup, no workspace or login information ever leaves your local network. Eigent is fully local by default, so you can audit and trust that your data stays put.
3. Modify .env.development for Local Proxy

Next, we need to tell the front-end to use the local back-end instead of any cloud service. In the project root (eigent/.env.development), enable the local proxy settings. Open .env.development in a text editor and make sure it contains:
VITE_BASE_URL=/api
VITE_PROXY_URL=http://localhost:3001
VITE_USE_LOCAL_PROXY=true
By setting VITE_USE_LOCAL_PROXY=true and pointing VITE_PROXY_URL to http://localhost:3001, you configure the front-end to send all API calls to your local Docker backend. The screenshot below shows the relevant lines in the .env.development file:
Edit *.env.development: set **VITE_PROXY_URL to http://localhost:3001 and VITE_USE_LOCAL_PROXY=true to enable local mode.*
Make sure to remove any leading # or comment markers on those lines so they take effect. With this configuration, the front-end app will proxy requests to your local server rather than the external demo API.
4. Run the Frontend App

Now go back to the repo root and install the JavaScript dependencies, then start the development server:
cd ..
npm install
npm run dev
This will launch the Eigent front-end locally. By default it runs on http://localhost:3000. With the .env changes, the front-end will contact the API at http://localhost:3001 – all within your machine.
> eigent@* dev
> vite

  VITE vX.X.X  ready in Y ms

  ➜  Local:   http://localhost:3000/
No special cloud credentials are needed here – it’s just a normal Node development build.
5. Access the Eigent UI Locally

Eigent’s login screen, served locally. Although sign-in is required, this instance is self-hosted and no external service is involved.
Rest assured, this login is purely for the local app – your credentials and data are saved in the local Postgres database you started, not some cloud server. In other words, even though the UI presents an OAuth-style login, all authentication and user data lives on your machine. The documentation emphasizes this local-first setup: “Your data stays on your own device, addressing privacy and security concerns”. Once logged in, you’ll reach the main dashboard where you can create custom agents, define workflows, and configure tools.
For example, the tools/settings page lets you enable or disable built-in integrations (web search, Google docs, Slack, etc.), and the model selection screen (shown below) lets you pick or configure your preferred LLM. Everything from here on – agent messages, tool outputs, knowledge bases – will remain in your PostgreSQL database and local filesystem unless you explicitly export it.

The Eigent UI lets you configure integrated tools (Slack, web search, etc.) on your local instance.
Choose which models or APIs to use for agents in the local Eigent setup.
Note: when running in local mode, users need to set up their own API keys or endpoints for models.
Watch the Full Tutorial
Prefer a visual guide? We’ve recorded a step-by-step walkthrough that takes you through the entire process, from spinning up Docker to logging into Eigent locally.
YouTube Tutorial: Local Eigent Setup
What’s Next?
And that’s it, you’ve just spun up your very own Eigent AI workforce, fully local and self-hosted.
No cloud lock-in, no data leakage, just agents running on your terms.
👉 Clone the repo and build it yourself
If you run into issues, have feature requests, or just want to share what you’re building, we’d love to hear from you.
Join the conversation on our Discord community, the team and other builders hang out there to answer questions, swap ideas, and collaborate on new workflows.