In the first part of the series, we looked at how to set up a jj repo and make our first push to GitHub. We touched on “commit”s and bookmarks in jj. Be sure to check out that one if you don’t know what these words mean!
Now we get into the more interesting stuff: how to submit PRs and edit them easily.
Note: I’ve since shortened the id for a jj commit to 4 characters in the config by setting
'format_short_id(id)' = 'id.shortest(4)'undertemplate-aliases
0: Old friends, new friends, immutable friends
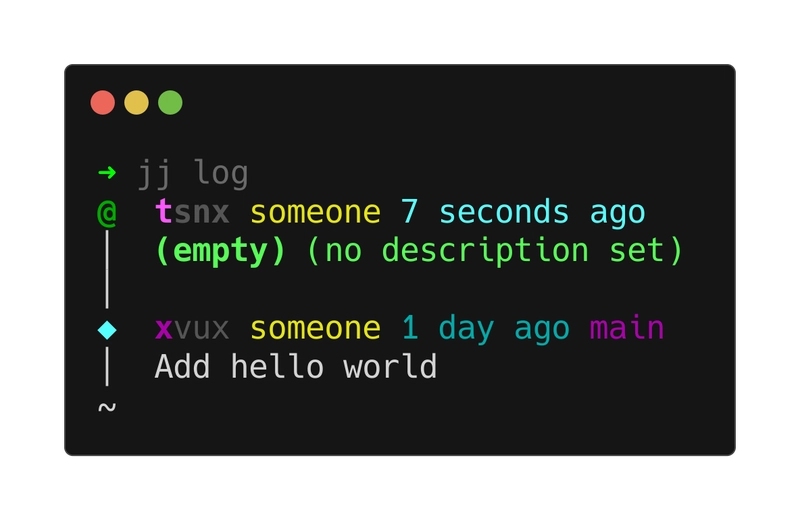
Before doing anything, let’s run jj log again to check the status after our first push.
Hmm, something unusual is going on here. We said in the first tutorial that the line starting with ◆ is the root commit. Why is the root commit not shown here? Why is the ◆ on our previous commit? And what is this ~ thing?
Let’s tackle these one by one. First of all, ~ means that there are more commits to be shown. We can see all the commits by running jj log -r 'all()'
◆ marks the root commit, but it also marks our “Add hello world” commit xvux that we just pushed to main. It means these are immutable commits. Indeed, if we try to edit it, we would get an error.
> jj edit x                                                                                                                                                                         (base)
Error: Commit 47b0d687d09c is immutable
Hint: Could not modify commit: xvux main | Add hello world
Hint: Immutable commits are used to protect shared history.
Hint: For more information, see:
      - https://jj-vcs.github.io/jj/latest/config/#set-of-immutable-commits
      - `jj help -k config`, "Set of immutable commits"
Hint: This operation would rewrite 1 immutable commits.
Since these commits cannot be modified, they are not very interesting to us. So jj hides them by default and only shows the latest immutable commit. I quite like that.
Note: technically the commit can be modified if you “force push” to main, but it is a very dangerous operation! We will not cover it here.
Now to the actual PR.
1: Create a Pull Request 🚀
Let’s wrap our hello world in a function. We will make an intentional spelling error to be fixed later.
def hellp():
    print("hello world!")
Let’s commit like before:
jj commit -m "my first pr"
We could create a new bookmark like we did before, but I am lazy and choose to let jj do it automatically this time.
jj git push --change t
jj will generate a bookmark on that commit and push. It will also generate a link for you to open a pull request.
Creating bookmark push-tsnxozwsqwwt for revision tsnxozwsqwwt
Changes to push to origin:
  Add bookmark  to
remote:
remote: Create a pull request for  on GitHub by visiting:
remote:      https://github.com//pull/new/
remote:
2: Edit the PR with Feedback 🔄
Code review is a conversation and usually involves multiple back and forth edits. Let’s say a teammate reviews your PR and asks you to fix the typo.
With jj, there are ways to directly edit the original commit, which keeps the history clean.
Fixing the typo
After you write the fix, run jj diff. We see that saved changes are reflected.
Since the fix is happening in the “Working copy”, it is now one commit ahead of our original commit. We want to move the fix down to our original commit.
jj squash will do exactly that. It takes our new change and move it down to the commit we pushed. Our bookmark will have a *, indicating that something changed in this commit.
> jj squash

Working copy  (@) now at: slzw (empty) (no description set)
Parent commit (@-)      : tsnx push-tsnxozwsqwwt* | my first pr
Running jj git push will push our fix to the branch and to the PR. This way you won’t clutter the PR with commits like “Fix typo”.
> jj git push

Changes to push to origin:
Move sideways bookmark push-tsnxozwsqwwt from 4bb496b59686 to 80c14a7f4239
Changing the commit message
Another teammate points out that your commit message and PR title shouldn’t be named “my first pr” but something like “Refactor to hello()”. That’s a good point! The commit message is very easy to change in jj .
All we need is jj describe -r t -m "Refactor to hello()
Note:
-rstands for “revision”, a synonym to “commit”.tis the shortest unique id for our commit
We can jj git push again.
And now the PR is ready to be merged!
This is the place where our local history will start to diverge from the remote repo. The remote repo might also change because other people are working on it at the same time as you. In the next tutorial, we will explore how to deal with the difference and sync from remote to local. Stay tuned!


