How I built a restaurant discovery and dining plan generator AI Agent using Amazon Bedrock AgentCore, and why it’s easier than you think.
The Idea: AI Agent for Dining
You’ve just landed in Seattle for a business trip. It’s 7 PM, you’re hungry, and you have no idea where to eat. You want something authentic, not touristy, with good reviews, and ideally within walking distance of your hotel.
That’s when I decided to build my own AI dining assistant that could not only find restaurants but create complete dining plans with recommendations, party size considerations, and local insights.
What I Built: The Bedrock AgentCore Dining Agent
The agent I created does three things exceptionally well:
- Smart Restaurant Discovery: Uses real-time web search to find restaurants based on location, cuisine, or specific requirements
- Intelligent Menu Analysis: Automatically scrapes restaurant websites to understand their offerings
- Personalized Dining Plans: Creates detailed recommendations including party size, budget estimates, and local tips/taxes
But here’s the kicker – it took me less than 30 minutes to build and deploy, thanks to Kiro for building the frontend code in React and the backend AgentCore agent using Strands Agent framework (app.py) and deploying it on the Amazon Bedrock AgentCore Runtime.
The Magic Behind the Scenes
Real Data, Real Results
Unlike other AI assistants that give you generic responses, and incomplete web searches, my agent uses BrightData’s MCP integration to perform actual web searches and scrape real restaurant data. When you ask for “Italian restaurants in Seattle” you get current, accurate results with real ratings, addresses, and phone numbers.
Five AI Models, One Interface
The agent supports five different Bedrock models:
- Nova Premier (my go-to for complex queries)
- Nova Micro (lightning-fast for simple searches)
- Claude Sonnet 4 (excellent for creative dining plans)
- Claude Opus 4.1 (the most sophisticated reasoning)
- GPT-OSS 120B (OpenAI’s GPT open-weight Model that works really well with Bedrock and runs fast)
I can switch between models dynamically based on my preference – fast results or deep analysis.
Note: You might need to enable Bedrock model access for Amazon Nova and Anthropic Claude models. The OpenAI’s GPT-OSS models are enabled automatically in Bedrock, eliminating the friction between dev teams, however, these GPT-OSS Bedrock model are only available in the us-west-2 (Oregon) region at the time of publishing this blog.
Intelligent Tool Routing
The agent automatically decides which tools to use based on your request:
- “Find restaurants” → Triggers web search
- “Dining plan at Wild Ginger for 2” → Searches for the Wild Ginger restaurant, finds their website, scrapes the menu, and creates a personalized plan
- “Best sushi in Seattle” → Combines search with local insights
The Development Journey: Surprisingly Simple
Step 1: The Foundation (5 minutes)
I started with Amazon Bedrock AgentCore and the Strands Agent framework. The setup was straightforward:
from strands import Agent
from strands.models import BedrockModel

agent = Agent(
    model=BedrockModel("us.amazon.nova-premier-v1:0"),
    tools=[search_engine, scrape_as_markdown, create_dining_plan]
)
Step 2: MCP Integration (10 minutes)
The real power came from integrating BrightData’s MCP (Model Context Protocol) server. This gave my agent access to:
- CAPTCHA-protected Google search
- Professional web scraping capabilities
- Real-time data extraction
 api_token = os.getenv('BRIGHTDATA_API_TOKEN')
        if not api_token:
            raise ValueError("BRIGHTDATA_API_TOKEN environment variable not set")

        mcp_url = f"https://mcp.brightdata.com/sse?token={api_token}"

        async with sse_client(mcp_url) as (read_stream, write_stream):
            async with ClientSession(read_stream, write_stream) as session:
                await session.initialize()

                result = await session.call_tool(tool_name, arguments)
                return str(result.content[0].text) if result.content else "No result"
No more mock data or limited APIs – this agent works with the real web.
Step 3: React Frontend (15 minutes)
I built a clean React frontend with Kiro prompts:
- Model selection dropdown
- Local vs cloud endpoint switching
- Real-time response streaming
- Mobile-responsive design
The entire frontend took just 15 minutes because I focused on functionality over fancy animations.
Important Note: As a best practice, I recommend to use a separate frontend layer for the agent, and keep the Agent Business Logic separate in AgentCore, although you can still use AgentCore local itself as an UI option without needing a separate frontend layer. So in essence, you can use any of these options to host your frontend – a localhost frontend or cloud hosted single page app (S3, CloudFront, Amplify), Lambda, ECS, EKS, or AgentCore.
For my frontend, I used the React based localhost UI for this quick demo.
For my backend, I provided an option in UI (screenshot in next section) for switching between a local AgentCore backend and the AWS Cloud AgentCore Runtime backend just to demo both possibilities for a AgentCore backend.
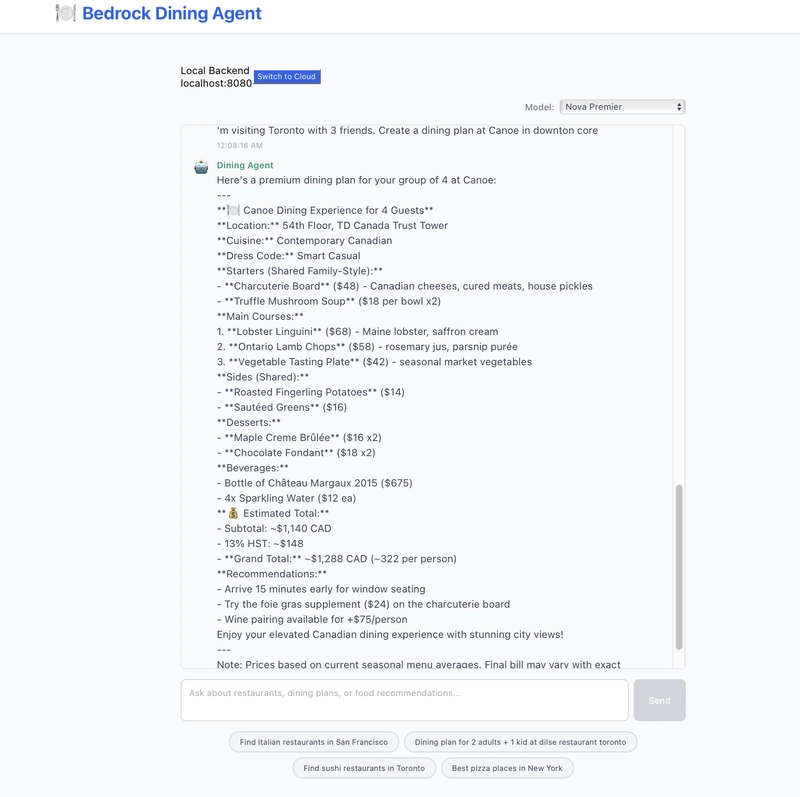
Real-World Testing: The “Toronto Test”
To test the agent, I asked it: “I’m visiting Toronto with 3 friends. Create a dining plan at Canoe in downtown core”
Here’s what happened:
- Search Phase: The agent found Canoe restaurant in Toronto
- Menu Discovery: Found Canoe’s website and scraped their current menu
-
Plan Creation: Generated a complete dining plan including:
- Recommended dishes for sharing
- Wine pairings
- Budget estimate (~$322 CAD for 4 people)
- Reservation tips
Total response time: 50 seconds. Quality: Better than a human concierge or other AI conversation agent.

Deployment: From Local to Cloud in One Command
Local Development (for frontend in React and backend dining agent in AgentCore local)
Running locally is very simple:
python app.py &
cd frontend && npm start &
Two commands, and you have a full-stack AI dining assistant running on your laptop.
Cloud Deployment (for backend dining agent in AgentCore Runtime)
Here’s where AgentCore really shines. Deploying backend to AWS AgentCore Runtime took literally one command:
agentcore launch
That’s it. No Docker files, no Kubernetes manifests, no infrastructure headaches. Following simple prompts with agentcore CLI, AgentCore handled:
- Container building via CodeBuild
- ECR repository creation
- IAM role configuration
- Runtime deployment
- Auto-scaling setup
To test the deployed Cloud AgentCore runtime with my local frontend:
python cloud_proxy.py &
This starts a proxy server on port 8081 that connects my local frontend to the deployed AgentCore runtime, enabling seamless local-to-cloud testing.
In 15 minutes, I had a production-ready AI agent running in the cloud with enterprise-grade reliability.
Screenshot of Agent sandbox in AgentCore Console to test the AgentCore Runtime Hosted Endpoint:
The Secret Sauce: Environment Variables Done Right
One critical lesson I learned: AgentCore has two configuration layers. The YAML file handles deployment settings, but runtime environment variables (like an API token) require a separate step:
aws bedrock-agentcore-control update-agent-runtime \
  --agent-runtime-id YOUR_AGENT_ID \
  --environment-variables 'BRIGHTDATA_API_TOKEN=your_token'
This separation ensures security and flexibility in production environments.
Agent Beyond Just Restaurants
While I built this for restaurant discovery, the architecture demonstrates something bigger. This is how AI agents should work:
- Real data integration with MCP Tools (not hallucinated responses)
- Multiple model support (choose the right tool for the job)
- Seamless deployment (from laptop to cloud in minutes)
- Production-ready security (proper environment variable handling)
The same pattern works for travel planning, event coordination, research assistance, or any domain where you need AI to interact with real-world data.
Why Bedrock AgentCore Wins
Traditional Approach:
- 2-3 days for infrastructure setup
- Multiple services to manage (API Gateway, Lambda, ECS, etc.)
- Complex deployment and orchestration pipelines
- Ongoing maintenance overhead
AgentCore Agentic AI Approach:
- 30 minutes total development time
- One command deployment
- Zero infrastructure management
- Built-in scaling and monitoring
The productivity difference is the key.
Try It Yourself
The complete code is available, and you can have your own dining agent running in minutes:
- Clone the repository https://github.com/awsdataarchitect/bedrock-dining-agent
- Add your BrightData API token (free tier available, I used promo code devto1 for $250 credits) https://brightdata.com
-
Run locally:
python app.py & && cd frontend && npm start & -
Deploy to cloud:
agentcore launch
That’s it. You now have a production-ready AI dining assistant.
What’s Next?
This project opened my eyes to the potential of Bedrock AgentCore for rapid Agentic AI application development with seamless integration of ANY model supported by Bedrock (e.g. Claude, Nova, GPT-OSS) and ANY Agent framework (I used Strands Agents SDK), real-time data access through MCP tools, and effortless cloud deployment capabilities.
Next, I’m planning to enhance this agent with new features by using Kiro:
Reservation Agent: Automated table booking through Amazon Connect integration that calls restaurants directly to secure reservations based on your preferred time and group size.
AgentCore Memory: Enabling long term/short term memory that can remember past interactions and use them to create a personalized dining plan for the next time.
The pattern is the same: real data integration + multiple AI models + one-command deployment = powerful applications in minutes, not months.
Conclusion
Building sophisticated AI agents used to require teams of engineers and months of development. With Amazon Bedrock AgentCore, I built and deployed a production-ready dining assistant in 30 minutes.
Ready to build your own AI agent? The dining assistant is just the beginning.
Try the Bedrock Dining Agent: https://github.com/awsdataarchitect/bedrock-dining-agent
Deploy in 30 minutes: Follow the README quick start guide
Questions? Reach out – I’d love to see what you build next. As Werner says, now go build!