
In this article, we will look at the integration of the Centrifugo real-time server with the Laravel framework, the basic settings and nuances of operation.
This article will be more about the implementation on the framework itself than the description of Centrifugo.
You can also find an example of interaction in this template, which was described in an article about frankenphp+laravel
Centrifugo is a real–time server that supports various transports for connecting clients, including WebSocket, HTTP streaming, Server-Sent Events (SSE), and others. It uses the publish-subscribe pattern for messaging
It acts as an intermediary (proxy) between your backend and clients (web, mobile applications). Its main task is to deliver messages from the server to clients and between clients instantly.
What he can do:
- One-way mailing (Push notifications): The server can send a message to all subscribed clients or specific users.
- Two-way communication (Pub/Sub): Clients can subscribe to channels (topics) and publish messages in them that all other subscribers will receive (if they have rights).
- Scaling: Easily runs in a cluster (via Redis or Tarantool) to handle the load of millions of connections.
- Reliability: Restores lost connections and delivers messages that were sent while the client was offline (persistent channels).
- Checking access rights: Connection and publication requests always go through your backend for authorization, which ensures security.
Key Philosophy:
Centrifugo does not replace your backend and database. It takes care of the most difficult and resource—intensive part – maintaining millions of constant connections and efficiently sending messages, while the application logic remains on your server.
You can find the documentation here
Deploying the Centrifugo:
We will install it via docker
dockerfile example:
FROM centrifugo/centrifugo:v6 as Base

FROM base AS dev

COPY .docker/centrifugo/config-test.json /centrifugo/config.json

CMD ["centrifugo", "-c",  "config.json"]

FROM base AS prod

COPY .docker/centrifugo/config.json /centrifugo/config.json

CMD ["centrifugo", "-c",  "config.json"]
In this example, we are lifting the container with our service and adding a config with settings.
we use multistaging by separating the configs:
- we store the test config in the repository
- the second one is on the server or in env github/gitlab
this separation is necessary because it contains the encryption keys and the password from the admin panel.
example of a test configuration:
{
  "token_hmac_secret_key": "your-secret-here",
  "admin_password": "strong-password",
  "admin_secret": "admin-secret",
  "api_key": "your-api-key",

  "channels": [
{
"name": "news",
"publish": true, // Allow clients to publish
      "subscribe": true, // Allow clients to subscribe
      "history_size": 100, // Store the last 100 messages
      "history_ttl": "5m" // Keep the history for 5 minutes
    },
    {
"name": "user:$user", // Personal channel (by user)
      "subscribe": true,
      "publish": false // Only the server can publish
    },
    {
"name": "chat:room-#rooms", // Channel with rooms
      "presence": true, // Enable presence tracking
      "join_leave": true // Send input/output events
}
]
}
to generate your config, you must go into the container and enter the command – centrifugo genconfig
or you can take an example from documentation
token_hmac_secret_key: Mandatory secret for signing clients’ JWT tokens.
admin_password / admin_secret: The password for entering the admin panel and the secret for the admin API.
api_key: The key for calling the Server API (for publishing from the backend).
engine: Select an engine for data storage (memory, redis, tarantool). The default value is memory.
presence: Enables global channel presence tracking.
history_meta_ttl: How long to store the meta information of the message history.
namespaces: A more advanced alternative to channels for grouping channel settings.
Next, we add the service to docker compose (your description of the services may vary):
dev – stage:
services:
    centrifugo:
      build:
        dockerfile: .docker/centrifugo/Dockerfile
        target: dev
      container_name: centrifugo.${APP_NAMESPACE}
      ports:
        - '8089:8000'
      networks:
        - app
      ulimits:
        nofile:
          soft: 65535
          hard: 65535
prod:
services:
    centrifugo:
      build:
        dockerfile: .docker/centrifugo/Dockerfile
        target: prod
      container_name: centrifugo.${APP_NAMESPACE}
      ports:
        - '8089:8000'
      networks:
        - app
      ulimits:
        nofile:
          soft: 65535
          hard: 65535
This service operates on the internal 8000 port, so we open the port available to you for external access.
Next, we launch our docker compose and start adding variables to env and installing the sdk library for Laravel.
Installing the sdk that is listed in the dock – at this stage it is officially recommended to install this repository
Follow the installation instructions from the README file
After installation, we check that we have correctly specified the variables in env
After installation, we check that we have correctly specified the variables in env
BROADCAST_DRIVER=centrifugo
BROADCAST_CONNECTION=centrifugo

CENTRIFUGO_TOKEN_HMAC_SECRET_KEY="your_secret_key"
CENTRIFUGO_API_KEY="your_api_key"

CENTRIFUGO_URL=http://centrifugo:8000
BROADCAST_DRIVER & BROADCAST_CONNECTION – the driver and connection that we generated based on the README library
CENTRIFUGO_TOKEN_HMAC_SECRET_KEY – token from the config token_hmac_secret_key
CENTRIFUGO_API_KEY – token from the config api_key
CENTRIFUGO_URL – specify our service and its internal port
Now we can start writing events.
you can find out how events and broadcast work from documentation
An example of using the Centrifugo:
1) An example of sending an event via cron
In this example, we will send the current date to the public channel every 5 seconds.
Example command:
declare(strict_types=1);

namespace App\Console\Commands;

use App\Events\ExampleEvent;
use Illuminate\Console\Command;
use Symfony\Component\Console\Attribute\AsCommand;

#[AsCommand('example:run')]
class ExampleCommand extends Command
{
    public function handle(): void
    {
        ExampleEvent::dispatch();
    }
}
Here we trigger an event to send a date.
Example of sending directly via the sdk:
declare(strict_types=1);

namespace App\Console\Commands;

use Symfony\Component\Console\Attribute\AsCommand;
use denis660\Centrifugo\Centrifugo;
use Illuminate\Console\Command;

#[AsCommand('centrifugo:run')]
class CentrifugoCommand extends Command
{
    public function handle(Centrifugo $centrifugo): void
    {
        $centrifugo->publish('example', ['time' => now()]);
    }
}
We register the Centrifugo class through the command argument and call the publish method
publish – takes the name of the channel as the first argument, and the second argument is an array with the data that we want to transfer to the channel.
Now we can register the command and specify at what time it will be executed – example of working with cron in Laravel
An example of registering a team in kron:
// routes/console.php


declare(strict_types=1);

use App\Console\Commands\ExampleCommand;
use Illuminate\Support\Facades\Schedule;

Schedule::command(ExampleCommand::class)->everyFiveSeconds();
Next, we describe the event that will be executed in our team.
Example of an event:
declare(strict_types=1);

namespace App\Events;

use App\Enums\ChannelName;
use Carbon\Carbon;
use Illuminate\Bus\Queueable;
use Illuminate\Contracts\Broadcasting\ShouldBroadcast;
use Illuminate\Broadcasting\InteractsWithSockets;
use Illuminate\Foundation\Events\Dispatchable;
use Illuminate\Broadcasting\Channel;

class ExampleEvent implements ShouldBroadcast
{
    use Dispatchable;
    use InteractsWithSockets;
    use Queueable;

    public function __construct()
    {
    }

    public function broadcastOn(): array
    {
        return [
            new Channel(
// using enum instead of the magic value
                ChannelName::Example->value
            ),
        ];
    }

    public function broadcastWith(): array
    {
        return [
            'date' => Carbon::now()->format('Y-m-d H:i:s'),
        ];
    }
}
The logic for sending events to the channel is ready
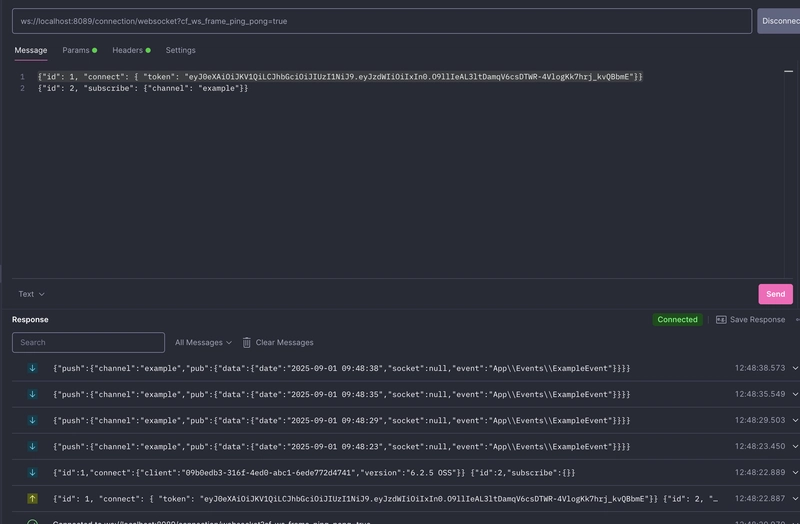
The photo below describes the authorization and subscriptions to the channel, below we can observe the responses from the channel according to the described logic – that every 5 seconds we get the current time.
I will describe about channel authorization and testing through postman below

2) An example of sending a message to a chat
In this example, we will analyze sending events for messenger messages.
Example of a controller for creating a message:
declare(strict_types=1);

namespace App\Http\Controllers\Api\Message;

final readonly class MessageController
{
    public function __construct(
        private MessageService $messageService,
    ) {
    }

    public function store(int $chatId, StoreDTO $storeDTO): array
    {
        $chat = Chat::query()->findOrFail($chatId);
        Gate::authorize('show', $chat);

        return $this->messageService->store($chat, $storeDTO);
    }
In the controller, we search for a chat from the database and check if we have access, then we return a response from the service.
An example of a message service:
declare(strict_types=1);

namespace App\Services\Message;

final readonly class MessageService
{
    public function store(Chat $chat, StoreDTO $storeDTO): array
    {
        $message = Message::query()
            ->create([
                'chat_id' => $chat->id,
                'user_id' => auth()->id(),
                'message' => $storeDTO->message,
            ]);

        MessageCreated::dispatch($message);

        return ShowDTO::from($message)->toArray();
    }
Here we create chat messages, call a reply to create messages, and return data about the created message.
Example of an event for a created message:
declare(strict_types=1);

namespace App\Events\Message;

use App\DTO\Event\Message\CreateDTO;
use App\Enums\Channel\ChannelName;
use App\Enums\Event\MessageEventName;
use App\Models\Message;
use Illuminate\Broadcasting\Channel;
use Illuminate\Broadcasting\InteractsWithSockets;
use Illuminate\Contracts\Broadcasting\ShouldBroadcast;
use Illuminate\Foundation\Events\Dispatchable;
use Illuminate\Queue\SerializesModels;

final class MessageCreated implements ShouldBroadcast
{
    use Dispatchable;
    use InteractsWithSockets;
    use SerializesModels;

    public function __construct(
        private readonly Message $message
    ) {
    }

    public function broadcastAs(): string
    {
//enum for the event name
        return MessageEventName::MessageCreated->value;
    }

    public function broadcastOn(): Channel
    {
        return new Channel(
//enum through which we create the chat channel name.11
            ChannelName::Chat->byId($this->message->chat_id)
        );
    }

    public function broadcastWith(): array
    {
        return CreateDTO::from($this->message)->toArray();
    }
}
In this event, we accept the message model and output the array to the channel.
It is also mandatory to use a public channel and not register channel authorization, I will explain why below.
An example that we will receive when sending a message:

When sending an event, it was received by all chat participants.
Nuances that are worth clarifying:
Centrifugo does not integrate with Laravel’s channel authorization mechanism out of the box. Instead, it uses its own, more flexible authorization mechanism based on JWT tokens that are generated by your backend – that is, the code below will not work.
use App\Models\User;

Broadcast::channel('orders.{orderId}', function (User $user, int $orderId) {
    return $user->id === Order::findOrNew($orderId)->user_id;
});
Private channels in Centrifugo are implemented not through the Laravel mechanism, but by sending a request to your backend (subscription process) or pre-generating a token with access rights.
We also cannot send through events to all users of the channel except the sender himself, based on the conclusion above – the code below will not work
use App\Events\OrderShipmentStatusUpdated;

broadcast(new OrderShipmentStatusUpdated($update))->toOthers();
If you want to implement this logic, you will have to write it yourself.
If we do not want to implement this logic, we will have to process the event skipping at the sender on the client.
WS testing
You can do this using the sdk for the client – examples or using Postman or its analogues – example from the documentation
For testing via Postman, specify the parameter in the url cf_ws_frame_ping_pong=true
The link will look like this:
ws://localhost:8089/connection/websocket?cf_ws_frame_ping_pong=true
Next, we will describe the interaction using json.
Example of authorization in the Centrifugo:
{"id": 1, "connect": { "token": "your_auth_token"}}
id – record identifier
connect – the type of action that we specify when connecting to the Centrifugo
token – a token for user authorization (in the example below I will show an example of creating an authorization token)
Example of channel subscription:
Here we subscribe to the public channel public-channel
{"id": 2, "subscribe": {"channel": "public-channel"}}
To subscribe to a private channel, you must specify another channel authorization token.
{"id": 2, "subscribe": {"channel": "private-channel", "token": "your_channel_token"}}
id – record identifier
subscribe – the type of action specified when subscribing to the channel in the Centrifugo
channel – the key that contains the name of the channel we want to subscribe to
token – a token for user authorization (in the example below I will show an example of creating an authorization token)
In the end, you should get the following

Next, we need to click the Connect button
After we connect, we need to send our instructions by clicking on the send button
After all the steps, we should see the given answers.

After sending the events, he authorizes the user and subscribes to the channel.
In case of errors, you can safely find their description by error code here
Conclusion about the Centrifugo
As a result, we have that the sdk gives us event support – we send event data to the specified channel – and all the rest of the logic falls on the centrifugo.
We will need to write the authorization methods for our backend application and the centrifugo ourselves – it can support authorization both through sessions and through a token.
Example of creating a token for authorization in the Centrifugo:
Example of an authorization controller:
declare(strict_types=1);

namespace App\Http\Controllers\Api;

final readonly class AuthController
{
    public function __construct(
        private AuthService $authService
    ) {
    }

    public function WSAuth(): array
    {
        $user = User::query()->findOrFail(auth()->id());

        return $this->authService->WSAuth($user);
    }
Example of the AuthService Service:
declare(strict_types=1);

namespace App\Services\Auth;

final readonly class AuthService
{
    public function __construct(
        private Centrifugo $centrifugo,
    ) {
    }

    public function WSAuth(User $user): array
    {
        $token = $this->centrifugo->generateConnectionToken((string) $user->id);

        return new TokenDTO($token)->toArray();
    }
Here we use the Centrifugo class, which provides us with the sdk and calls the generateConnectionToken method from it, which accepts the string UserId, at the end I output the token itself.
After that, we can process this handle for the client and use the generated token for authorization in the Centrifugo
Private channels:
Based on the fact that we cannot use private laravel channels, we must protect them in another way.
To do this, Centrifugo provides an API to authorize the client to a private channel through a token – we will generate a token in our backend application.
An example of creating a token for authorization in a private channel:
public function generatePrivateToken(User $user): array {
    $token = $this->centrifugo
        ->generatePrivateChannelToken(
            (string) $user->id,
            'your_private_channel'
        );

    return new TokenDTO($token)->toArray();
}
By analogy with user authorization in the Centrifugo, we can generate a token for a private channel.
Also, Centrifugo is able to subscribe an authorized user to channels and unsubscribe (it works for both public and private channels), which allows us to manage the process more flexibly.
Example of channel subscription
I’ll show you an example of a user subscribing to all their chats.
Example of a controller:
declare(strict_types=1);

namespace App\Http\Controllers\Api\WS;

final readonly class WSController
{
    public function __construct(
        private WSService $wsService,
    ) {
    }

    public function subscribe(): Response
    {
        $user = auth()->user();

        $this->wsService->subscribe($user);

        return response()->noContent();
    }
}
Here we get an authorized user and call “WSService”
Example of the WSService service:
declare(strict_types=1);

namespace App\Services\WS;

final readonly class WSService
{
    public function __construct(
        private Centrifugo $centrifugo,
        private ChannelService $channelService,
    ) {
    }

    public function subscribe(User $currentUser): void
    {
        $chatChannels = $this->channelService->chats($currentUser);

        foreach ($chatChannels as $channel) {
            $this->centrifugo->subscribe(
                $channel->name,
                (string) $currentUser->id
            );
        }
    }
}
From the ChannelService we get his current chats in the already in the loop we subscribe each chat to the user using the subscribe method
Example of unsubscribing from a channel
Here in the example, we will unsubscribe when each participant’s group is removed from the Centrifugo
public function unsubscribe(Chat $group, Collection $members): void
{
    $members->each(function (User $member) use ($group): void {
        $this->centrifugo->unsubscribe(
            ChannelName::Chat->byId($group->id),
            (string) $member->id
        );
    });
}
The result:
We have set up and deployed Centrifugo in a laravel project, shown you examples of how to work with it, and also added it to the template so that you can easily use it and start your wonderful projects.
GitHub – I will be glad to receive your subscription to me in github
Thank you for reading this article.
Hi. We run a YouTube growth service, which increases your number of subscribers both safety and practically.
– We guarantee to gain you new 500 subscribers per month
– People subscribe because they are interested in your videos/channel, increasing video likes, comments and interaction.
– All actions are made manually by our team. We do not use any bots.
The price is just $60 (USD) per month, and we can start immediately. If you are interested and would like to see some of our previous work, let me know and we can discuss further.
Kind Regards,
To Unsubscribe, reply with the word unsubscribe in the subject.