Introduction
Every cloud application begins with a secure and scalable network foundation. In Azure, Virtual Networks (VNets) provide the backbone for connecting applications, databases, and security appliances while maintaining private, isolated environments.
In this guide, we’ll walk through how to:
- Create hub-and-spoke virtual networks for a web app.
- Add subnets for frontend, backend, and firewall workloads.
- Configure secure VNet peering to enable private communication.
By the end, you’ll know how to design a simple but production-ready network architecture in Azure.
Skilling Objectives
You will learn how to:
- Deploy virtual networks and subnets in Azure.
- Set up a hub-and-spoke network topology.
- Configure VNet peering for secure inter-network communication.
Architecture Overview
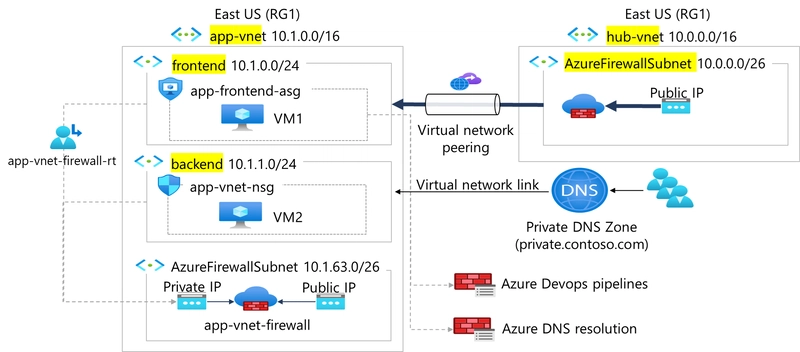
The hub-and-spoke model you created is a common Azure networking pattern designed for scalability, security, and manageability.
- The hub-vnet acts as the central control point. It hosts shared services such as the Azure Firewall, monitoring tools, or VPN gateways. By centralizing security here, you avoid duplicating firewall or gateway resources in every network.
-
The app-vnet serves as the spoke network. It contains two isolated subnets:
- The frontend subnet, which hosts the web servers that users interact with.
- The backend subnet, which hosts databases or internal services that should never be exposed directly to the internet.
-
VNet peering creates a secure, private connection between the hub and spoke, allowing traffic to flow as if both networks were part of a single VNet, while still keeping administrative boundaries.
This architecture ensures that application traffic flows privately through Azure’s backbone without touching the public internet, while also keeping workloads segmented for better security and compliance.
Step 1: Create the App Virtual Network & Subnets
💡 Why start here?
The application network (spoke) hosts the workload — web servers in the frontend subnet and databases in the backend subnet. Segmenting resources into subnets improves security and traffic control.
- Sign in to the Azure Portal.
-
Search for Virtual Networks and click + Create.


-
Select the existing resource group or create a new resource group e.g
RG1. -
Enter the virtual network name
app-vnetand choose East US as the region.
-
Define the IP address space as
10.1.0.0/16.
-
Under subnets, create one named frontend with address range
10.1.0.0/24, and another named backend with address range10.1.1.0/24.

-
Click Review + create, then Create.

✅ At this point, you have a dedicated application network ready for workloads.
Step 2: Create the Hub Virtual Network
💡 Why a hub?
The hub is the central network that connects to external services and enforces security policies like firewalls, monitoring, or VPNs.
-
Go back to Virtual Networks and click + Create again.

-
Use the same resource group
RG1. -
Name this network
hub-vnetand choose East US.
-
Assign the address space
10.0.0.0/16. -
Edit the default subnet/Add a subnet named AzureFirewallSubnet with the range
10.0.0.0/26.
-
Select Review + create, then Create.

✅ You now have a hub network prepared to secure and route traffic.
Step 3: Configure VNet Peering
💡 Why VNet peering?
Peering allows virtual networks to communicate privately without using the public internet. This ensures secure traffic flow between your application and hub services.
-
Open app-vnet from the list of virtual networks.

-
Under Settings, select Peerings, then click + Add.

-
Enter the remote peering link name as
app-vnet-to-hub. -
Select the virtual network
hub-vnetas the peer.
-
For the local peering link name, enter
hub-to-app-vnet. -
Leave other settings at their defaults and click Add.

✅Once deployment completes, confirm that the peering status shows Connected.
Step 4: Verify the Architecture
💡 Why verify?
Testing ensures that connectivity works before deploying critical workloads.
- Open both
app-vnetandhub-vnetin the portal to confirm their subnets exist. - Check that the peering connection shows as connected.

Conclusion
In this hands-on guide, you’ve built the foundation for a secure and scalable Azure network:
- An app virtual network with separate frontend and backend subnets.
- A hub virtual network with a firewall subnet.
- VNet peering to enable secure, private communication between the two.
This hub-and-spoke design is widely used in Azure networking to keep applications isolated yet connected to centralized services.