Introduction: What Is Amazon EBS and Why Does It Matter?
Amazon Elastic Block Store (EBS) is AWS’s scalable, high-performance block storage service designed for use with EC2 instances. Think of it as a virtual hard drive in the cloud—one that you can attach, detach, resize, and persist independently of your compute resources.
Unlike the ephemeral storage that comes with EC2 instances (which vanishes when the instance is stopped or terminated), EBS volumes are durable and persistent. This makes them ideal for storing critical data like:
-
Databases and transaction logs
-
Application files and binaries
-
Backups and snapshots
-
Media assets or user uploads
EBS volumes are also highly configurable. You can choose between SSD-backed volumes for fast IOPS or HDD-backed volumes for throughput-heavy workloads. And with features like encryption, snapshots, and multi-attach, EBS becomes a powerful tool for building resilient, secure, and scalable cloud architectures.
In short: if your EC2 instance needs reliable storage that survives reboots, scales with your needs, and integrates seamlessly with AWS services—EBS is your go-to solution.
Prerequisites
Before we begin, make sure you have:
- An EC2 instance running Ubuntu
Appropriate IAM permissions to create and manage EBS volumes
Access to the AWS Management Console or CLI
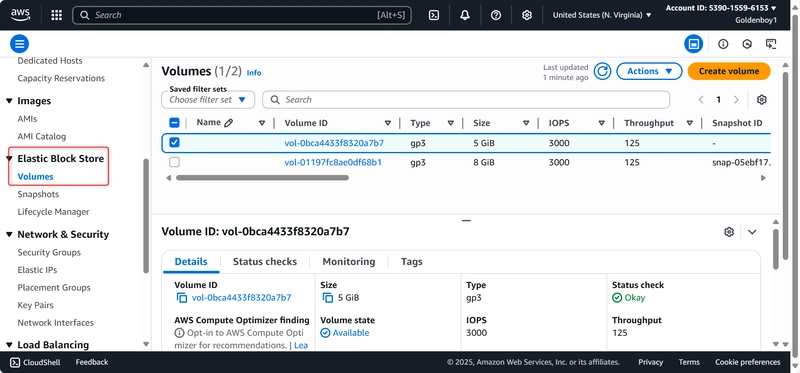
Step 1: Create an EBS Volume
- Go to the EC2 Dashboard → Elastic Block Store → Volumes

- Click Create Volume

- Choose:
-
Volume type: gp2 or gp3
-
Size: e.g., 5 GiB

4.Availability Zone: must match your EC2 instance’s AZ
Click Create Volume
Tip: You can find your EC2 instance’s AZ under Instance Details.
Step 2: Attach the Volume to Your EC2 Instance
- Select the newly created volume

-
Click Actions → Attach Volume
-

Choose your EC2 instance

- Set the device name (e.g., /dev/xvdf)

-
Click Attach

Step 3: Connect to Your EC2 Instance
Use SSH to connect:
bash
ssh -i your-key.pem ubuntu@your-ec2-public-ip

Step 4: Verify the Volume Is Attached
Run:
bash
lsblk

Step 5: Format the Volume
If the volume is new, format it:
bash
sudo mkfs -t ext4 /dev/xvdf

Step 6: Create a Mount Point
bash
sudo mkdir /mnt/myvolume

Step 6: Create a Mount Point
bash
sudo mkdir /mnt/myvolume
Step 7: Mount the Volume
bash
sudo mount /dev/xvdf /data

E
- Create a new file,like writting something into it
bash
echo “Hello from EBS!” | sudo tee /data/hello.txt

-
Verify the file was created
bash
cat /data/hello.txt

Step 8: Stop and Start the EC2
Wait→start it again

SSH back in
check your data:
bash
copy Edit
sudo mount /dev/xvdf /data
cat /data/hello.txt
Data is still there.because EBS is persistent
So to know the number of gig used
df -h

Conclusion
And that’s it! You’ve successfully attached and mounted an EBS volume to your Ubuntu EC2 instance. This setup is perfect for storing logs, databases, or any data that needs to persist beyond instance termination.