If you’ve ever managed blog content with MDX files in a Next.js project, you know the pain: every single blog post update requires a developer. A typo fix? Git commit. A new post? Code review. Your marketing team wants to update meta descriptions? Good luck coordinating that through Slack.
This was our reality at SynkPay. Until we switched to BlogNow.
The Problem: MDX Was Killing Our Velocity
Our setup before:
- Next.js 15 (App Router) + TypeScript
- Blog posts written as MDX files in
/content/blog/ - Tailwind CSS for styling
- Hosted on Vercel
The pain points:
- Every blog update needed a developer. Marketing team would write content in Google Docs → I’d copy-paste into MDX → commit → push → deploy.
- Coordination overhead. Small updates (fixing typos, updating dates) required going through the entire dev workflow.
- No content preview. Non-technical team members couldn’t see how posts would look until deployed.
- SEO tweaks were slow. Want to A/B test meta descriptions? That’s a code change.
We needed to decouple content management from the codebase without introducing WordPress bloat or paying $300/month for Contentful.
Why BlogNow?
I evaluated several options:
| Solution | Price | Why I Didn’t Choose It |
|---|---|---|
| WordPress | Free – $$ | Security nightmares, plugin hell, doesn’t fit modern stack |
| Contentful/Sanity | $300+/mo | Massive overkill for just a blog. Too many features we’d never use |
| Strapi | Self-hosted | Maintenance overhead. We wanted focus on product, not CMS infra |
| Keep MDX | Free | Non-technical team members blocked on devs for every change |
BlogNow checked all the boxes:
- ✅ Blog-only focus – No unnecessary features
- ✅ Affordable – $9.99-$49/mo vs $300+ for full CMSs
- ✅ Clean API/SDK – Felt like working with a well-designed library
- ✅ Powerful editor – Marketing team could write content without touching code
- ✅ Next.js-friendly – Built-in SSG/ISR support
The Integration Process
Total time: Less than a day (including migrating 6 existing blog posts from MDX)
Step 1: Set Up BlogNow Account
- Signed up at blognow.tech
- Created a workspace for SynkPay
- Generated an API key from the dashboard
Step 2: Install the SDK
npm install @blognow/sdk
Step 3: Create a BlogNow Client
I created a simple utility to initialize the SDK:
// lib/blognow.ts
import { BlogNow } from '@blognow/sdk';

export const blognowClient = new BlogNow(
  process.env.BLOGNOW_API_KEY!
);
Step 4: Fetch Posts in Next.js
Here’s where it gets beautiful. BlogNow’s SDK is built for Next.js App Router with proper TypeScript types:
// app/blog/page.tsx
import { blognowClient } from '@/lib/blognow';
import Link from 'next/link';

export const revalidate = 3600; // Revalidate every hour

export default async function BlogPage() {
  const posts = await blognowClient.posts.getPublished();

  return (
    <div className="container mx-auto px-4 py-16">
      <h1 className="text-4xl font-bold mb-12">Blog</h1>
      <div className="grid grid-cols-1 md:grid-cols-2 lg:grid-cols-3 gap-8">
        {posts.map((post) => (
          <Link
            key={post.id}
            href={`/blog/${post.slug}`}
            className="group"
          >
            <article className="border rounded-lg overflow-hidden hover:shadow-lg transition">
              {post.featuredImage && (
                <img
                  src={post.featuredImage}
                  alt={post.title}
                  className="w-full h-48 object-cover"
                />
              )}
              <div className="p-6">
                <h2 className="text-xl font-bold mb-2 group-hover:text-primary">
                  {post.title}
                </h2>
                <p className="text-muted-foreground mb-4">
                  {post.excerpt}
                </p>
                <time className="text-sm text-muted-foreground">
                  {new Date(post.publishedAt).toLocaleDateString()}
                </time>
              </div>
            </article>
          </Link>
        ))}
      </div>
    </div>
  );
}
Step 5: Individual Post Pages
Using Next.js dynamic routes with generateStaticParams for optimal performance:
// app/blog/[slug]/page.tsx
import { blognowClient } from '@/lib/blognow';
import { notFound } from 'next/navigation';

export const revalidate = 3600;

// Generate static paths at build time
export async function generateStaticParams() {
  const posts = await blognowClient.posts.getPublished();

  return posts.map((post) => ({
    slug: post.slug,
  }));
}

// Generate metadata for SEO
export async function generateMetadata({
  params
}: {
  params: { slug: string }
}) {
  const post = await blognowClient.posts.getBySlug(params.slug);

  if (!post) return {};

  return {
    title: post.metaTitle || post.title,
    description: post.metaDescription || post.excerpt,
    openGraph: {
      title: post.metaTitle || post.title,
      description: post.metaDescription || post.excerpt,
      images: post.featuredImage ? [post.featuredImage] : [],
      type: 'article',
      publishedTime: post.publishedAt,
    },
  };
}

export default async function BlogPostPage({
  params
}: {
  params: { slug: string }
}) {
  const post = await blognowClient.posts.getBySlug(params.slug);

  if (!post) notFound();

  return (
    <article className="container max-w-4xl mx-auto px-4 py-16">
      {post.featuredImage && (
        <img
          src={post.featuredImage}
          alt={post.title}
          className="w-full h-96 object-cover rounded-xl mb-8"
        />
      )}

      <h1 className="text-5xl font-bold mb-4">{post.title}</h1>

      <div className="flex items-center gap-4 text-muted-foreground mb-8">
        <time>
          {new Date(post.publishedAt).toLocaleDateString('en-US', {
            year: 'numeric',
            month: 'long',
            day: 'numeric',
          })}
        </time>
        {post.author && <span>• By {post.author.name}</span>}
      </div>

      {/* BlogNow returns HTML content ready to render */}
      <div
        className="prose prose-lg max-w-none"
        dangerouslySetInnerHTML={{ __html: post.content }}
      />
    </article>
  );
}
Step 6: The AI Prompt Magic
Here’s where I was genuinely surprised. BlogNow’s documentation includes AI prompts that you can paste directly into Claude/ChatGPT. I used their “Integrate BlogNow into existing Next.js project” prompt, and it:
- ✅ Generated the exact file structure I needed
- ✅ Set up proper TypeScript types
- ✅ Configured ISR with sensible revalidation times
- ✅ Added proper SEO metadata helpers
Got it right on the first try. No debugging, no Stack Overflow, no “why isn’t this working.”
Migrating from MDX
The most time-consuming part wasn’t the integration—it was migrating 6 existing blog posts from MDX to BlogNow.
The process:
- Created each post in BlogNow’s dashboard
- Used BlogNow’s built-in MDX → Rich Text editor feature
- Copy-pasted MDX content, and it automatically converted to rich text
- Adjusted images (uploaded to BlogNow’s media library)
- Set proper slugs to maintain URL structure
Time per post: ~10-15 minutes
Total migration time: ~2-3 hours
The MDX-to-rich-text conversion was surprisingly good. It handled:
- Headings and formatting
- Code blocks with syntax highlighting
- Links and images
- Lists and blockquotes
The Results

Before BlogNow:
- PageSpeed score: 85
- Marketing team: Blocked on devs for every change
- Blog update cycle: 2-3 days (coordination + dev time)
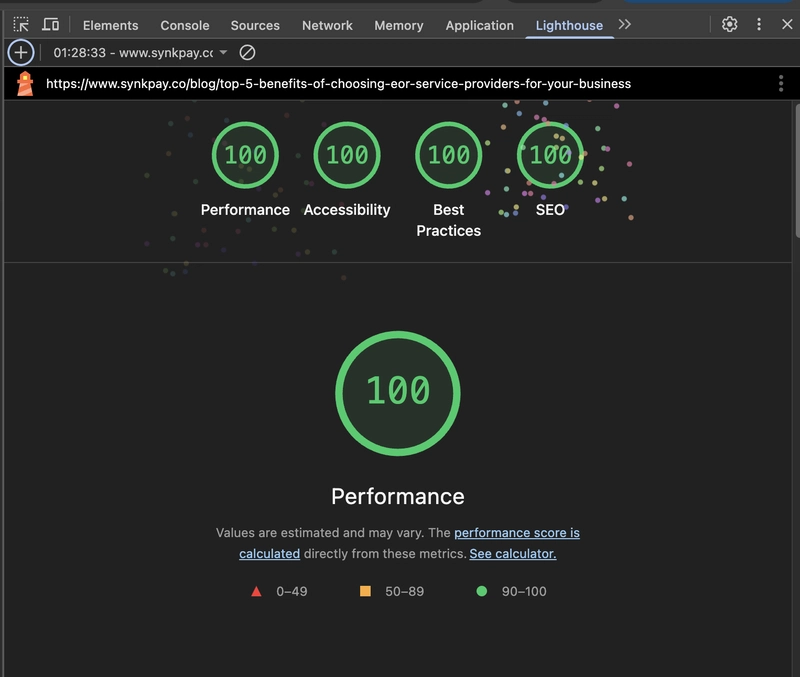
After BlogNow:
- PageSpeed score: 100 🚀
- Marketing team: Fully autonomous
- Blog update cycle: Real-time (publish from dashboard)
Why the PageSpeed boost?
BlogNow’s API responses are aggressively cached, and the SDK is lightweight (~5KB gzipped). Combined with Next.js ISR (Incremental Static Regeneration), our blog pages are:
- Pre-rendered at build time (SSG)
- Revalidated every hour (ISR)
- Served from CDN edge (Vercel)
This is basically the dream setup for performance.
SEO Impact
Our blog posts are now:
- ✅ Indexed within 24-48 hours (Google Search Console)
- ✅ Getting organic impressions from day one
- ✅ Properly structured with Schema.org Article markup
- ✅ Mobile-optimized with Core Web Vitals in the green
The Non-Technical Win
Here’s what I didn’t expect: our marketing team now publishes 2-3x more content.
Before: “Can you publish this blog post?” → me: “I’ll get to it after this sprint.”
Now: Marketing writes, previews, schedules, and publishes. No developer involved.
What I’d Do Differently
Honestly? Not much. The integration was smooth.
Code Snippets You Can Copy-Paste
API Route for On-Demand Revalidation
If you want to revalidate specific pages when content changes (instead of waiting for ISR):
// app/api/revalidate/route.ts
import { revalidatePath } from 'next/cache';
import { NextRequest, NextResponse } from 'next/server';

export async function POST(request: NextRequest) {
  const secret = request.nextUrl.searchParams.get('secret');

  // Verify webhook secret
  if (secret !== process.env.REVALIDATE_SECRET) {
    return NextResponse.json({ message: 'Invalid secret' }, { status: 401 });
  }

  const body = await request.json();
  const { slug } = body;

  try {
    // Revalidate the blog list page
    revalidatePath('/blog');

    // Revalidate the specific post page
    if (slug) {
      revalidatePath(`/blog/${slug}`);
    }

    return NextResponse.json({ revalidated: true });
  } catch (err) {
    return NextResponse.json({ message: 'Error revalidating' }, { status: 500 });
  }
}
Sitemap Generation
Generate a dynamic sitemap for SEO:
// app/sitemap.ts
import { blognowClient } from '@/lib/blognow';
import { MetadataRoute } from 'next';

export default async function sitemap(): Promise<MetadataRoute.Sitemap> {
  const posts = await blognowClient.posts.getPublished();

  const blogPosts = posts.map((post) => ({
    url: `https://synkpay.co/blog/${post.slug}`,
    lastModified: new Date(post.updatedAt),
    changeFrequency: 'weekly' as const,
    priority: 0.8,
  }));

  return [
    {
      url: 'https://synkpay.co',
      lastModified: new Date(),
      changeFrequency: 'daily',
      priority: 1,
    },
    {
      url: 'https://synkpay.co/blog',
      lastModified: new Date(),
      changeFrequency: 'daily',
      priority: 0.9,
    },
    ...blogPosts,
  ];
}
Tech Stack Summary
Frontend:
- Next.js 14 (App Router)
- TypeScript
- Tailwind CSS
- Vercel (hosting)
Content Management:
- BlogNow CMS
- @blognow/sdk (npm package)
Performance Optimizations:
- ISR with 1-hour revalidation
- Static generation for all blog pages
- CDN edge caching via Vercel
Final Thoughts
If you’re building a blog for a Next.js site and:
- Don’t want WordPress
- Can’t justify $300/mo for Contentful/Sanity
- Are tired of coordinating MDX updates with non-technical teams
BlogNow is worth checking out.
What I loved:
- Integration was genuinely fast (< 1 day including migration)
- SDK is clean and well-documented
- AI prompts actually worked (rare!)
- Marketing team is now autonomous
- PageSpeed went from 85 → 100
What could be better:
- More starter templates (currently focused on Next.js, but Vue/Nuxt coming)
- Built-in image optimization (though they do provide resize URLs)
Try It Yourself
If you want to integrate BlogNow into your Next.js project:
- Sign up: blognow.tech (7-day free trial)
- Read the docs: blognow.tech/docs
- Check out the starter: github.com/blognow/nextjs-starter
Questions? Drop them in the comments! I’m happy to share more details about the integration, performance optimizations, or anything else.
P.S. Here’s the live result: synkpay.co/blog