Building software often starts with solving everyday problems. One common problem is how to keep track of important information. People take notes during meetings, while studying, or when planning personal tasks. Paper notes get lost, and static files are hard to update. A digital note taking app offers a practical solution.
A note taking app allows you to create, edit, organize, and store notes in one place. It helps you keep information structured and easy to access. With simple features, you can add a title, write your content, assign tags, and search through your notes later. Storing notes in local storage ensures that your data remains available even after closing the browser.
This tutorial will guide you through the process of building a note taking app using JavaScript, HTML, and CSS. You will learn how to:
• Create a user interface for writing and displaying notes
• Add functionality to create, edit, and delete notes
• Build a search feature to filter notes by keywords or tags
• Store and retrieve notes using local storage
• Add a web clipping feature to save selected webpage text into your notes
By following these steps, you will complete a working note taking application that runs directly in the browser and supports practical features for managing your notes efficiently.
System Requirements
Browser Compatibility
• Google Chrome (recommended).
• Mozilla Firefox.
• Microsoft Edge.
• Safari.
Dependencies
• None. The app uses pure HTML, CSS, and JavaScript (no frameworks required).
Technologies Used: An outline of the foundational web technologies needed.
- HTML5 (for structuring the app)
- CSS3 (for styling)
- JavaScript (for functionality)
- Browser Local Storage (for data persistence)
Project Setup
Now that we have installed all basic requirements, we can now proceed to set up the project structure in our code editor.
At this stage we will learn how to open folder and arrange the file structure of the project. To do that, follow the steps bellow:
Folder structure
This is how the folder structure will look like.
note-taking-app/
  index.html
  style.css
  script.js
Steps
Let us follow these steps to create the folder and the files to structure our project.
-
Create a folder named note-taking-app.
-
Inside it, add three files:
index.html,style.css,andscript.js -
Link
style.cssinside the HTMLwith . -
Link
script.jsbefore the closingtag with .
At the end of the project, if you follow the exact codes bellow, this is what the product would look like.

Step 1: Build the HTML Structure
Now that we have created the folder and the files required for the project, we will now start to write the codes for the project.
In this step, we will write the HTML codes for the project, the html codes will determine the physical appearance of the project. Follow the steps bellow and write the codes to achieve the desired result.
Open theindex.html file and add the following code.
<!doctype html>
<html lang="en">
<head>
  <meta charset="utf-8">
  <meta name="viewport" content="width=device-width,initial-scale=1">
  <title>Notes</title>
  <link rel="stylesheet" href="style.css">
</head>
<body>
  <header>
    <h1>Notes</h1>
    <div class="controls">
      <input id="search" placeholder="Search notes">
      <button id="newNote">New Note</button>
    </div>
  </header>

  <main>
    <aside id="list"></aside>

    <section id="editor" class="hidden">
      <input id="title" placeholder="Title">
      <textarea id="content" placeholder="Write your note here"></textarea>
      <div class="editor-actions">
        <input id="tags" placeholder="Tags separated by commas">
        <button id="save">Save</button>
        <button id="delete">Delete</button>
        <button id="close">Close</button>
      </div>
    </section>
  </main>

  <script src="script.js"></script>
</body>
</html>
-
Navigation Bar (header): Contains the app title, a search box, and a button to create new notes.
-
Notes List Panel (aside): Displays all saved notes.
-
Editor Panel (section): Provides fields for writing, tagging, saving, or deleting notes. Hidden by default until a note is opened or created.
Step 2: Add CSS Styling
Now that we have written the HTML codes for the project, we can now write the CSS codes for the project that would be responsible for the beautification and positioning of the elements in the project.
Open the style.css file and add the following codes.
html, body {
  height: 100%;
  margin: 0;
  font-family: system-ui, Arial, Helvetica;
}

header {
  display: flex;
  justify-content: space-between;
  align-items: center;
  padding: 12px;
  border-bottom: 1px solid #ddd;
}

.controls input {
  padding: 8px;
  margin-right: 8px;
  width: 220px;
}

main {
  display: flex;
  height: calc(100% - 64px);
}

aside#list {
  width: 320px;
  border-right: 1px solid #eee;
  overflow: auto;
  padding: 12px;
  box-sizing: border-box;
}

.note-item {
  padding: 10px;
  border: 1px solid #f0f0f0;
  margin-bottom: 8px;
  cursor: pointer;
}

.note-item .meta {
  font-size: 12px;
  color: #666;
}

section#editor {
  flex: 1;
  padding: 12px;
  box-sizing: border-box;
}

section.hidden {
  display: none;
}

input, textarea, button {
  font-size: 14px;
  box-sizing: border-box;
}

#title {
  width: 100%;
  padding: 8px;
  margin-bottom: 8px;
}

#content {
  width: 100%;
  height: 60vh;
  padding: 8px;
  margin-bottom: 8px;
}

.editor-actions {
  display: flex;
  gap: 8px;
  align-items: center;
}

.app-note-tag {
  display: inline-block;
  padding: 2px 6px;
  margin-right: 6px;
  margin-top: 6px;
  border-radius: 4px;
  background: #f3f3f3;
  font-size: 12px;
}
-
Header Styling: Creates a top navigation bar with search and button.
-
Sidebar Styling: Sets width and scroll behavior for the notes list.
-
Editor Styling: Expands the editor panel and makes it flexible.
-
Note Item Styling: Adds borders, spacing, and hover-friendly design.
-
Responsive Layout: Flexbox ensures panels resize correctly.
Step 3: Add JavaScript Functionality
After we have written the CSS codes for the beautification of the project, we can now write the javaScript code to make the project interactive and functional.
Open the script.js file and add the following codes:
Setup and Local Storage (Initialization): This aspect of the code handles data persistence, making sure notes survive page reloads.
const storageKey = 'notes-v1'
let notes = []
let activeId = null

// Shortcut for selecting elements
const el = id => document.getElementById(id)

// Save notes to local storage
const saveToStorage = () => {
  localStorage.setItem(storageKey, JSON.stringify(notes))
}

// Load notes from local storage
const loadFromStorage = () => {
  const raw = localStorage.getItem(storageKey)
  if (!raw) return
  try {
    notes = JSON.parse(raw)
  } catch {
    notes = []
  }
}
Rendering and Displaying Notes:
This aspect of the code ensures users can see and search through their notes.
// Format timestamp into a readable string
const formatDate = ts => {
  const d = new Date(ts)
  return d.toLocaleString()
}

// Render list of notes in the sidebar
const renderList = filter => {
  const list = el('list')
  list.innerHTML = ''

  // Filter and sort notes
  const items = notes
    .filter(n => {
      if (!filter) return true
      const s = filter.toLowerCase()
      return n.title.toLowerCase().includes(s)
        || n.content.toLowerCase().includes(s)
        || (n.tags || []).join(' ').toLowerCase().includes(s)
    })
    .sort((a, b) => b.updated - a.updated)

  // Show message if no notes found
  if (items.length === 0) {
    const p = document.createElement('div')
    p.textContent = 'No notes found'
    list.appendChild(p)
    return
  }

  // Render each note as a card in the list
  items.forEach(n => {
    const item = document.createElement('div')
    item.className = 'note-item'
    item.dataset.id = n.id

    const h = document.createElement('div')
    h.textContent = n.title || 'Untitled'
    item.appendChild(h)

    const meta = document.createElement('div')
    meta.className = 'meta'
    meta.textContent = formatDate(n.updated)
    item.appendChild(meta)

    // Add tags (if any)
    if (n.tags && n.tags.length) {
      const tagWrap = document.createElement('div')
      n.tags.slice(0, 3).forEach(t => {
        const tspan = document.createElement('span')
        tspan.className = 'app-note-tag'
        tspan.textContent = t
        tagWrap.appendChild(tspan)
      })
      item.appendChild(tagWrap)
    }

    // Click event to open note in editor
    item.addEventListener('click', () => openEditor(n.id))
    list.appendChild(item)
  })
}
Editor Functions (Open, Close, Create, Save, Delete):
This aspect of the code provides the core functionality of the app, that is for the user to be able to create, read, update, and delete notes.
// Open editor for a specific note
const openEditor = id => {
  activeId = id
  const note = notes.find(x => x.id === id)
  el('editor').classList.remove('hidden')
  el('title').value = note.title || ''
  el('content').value = note.content || ''
  el('tags').value = (note.tags || []).join(',')
}

// Close editor and reset inputs
const closeEditor = () => {
  activeId = null
  el('editor').classList.add('hidden')
  el('title').value = ''
  el('content').value = ''
  el('tags').value = ''
}

// Create a new note
const createNote = () => {
  const id = 'n_' + Date.now()
  const now = Date.now()
  const note = {
    id,
    title: '',
    content: '',
    tags: [],
    created: now,
    updated: now
  }
  notes.push(note)
  saveToStorage()
  renderList(el('search').value)
  openEditor(id)
}

// Save current note
const saveNote = () => {
  if (!activeId) return
  const note = notes.find(x => x.id === activeId)
  if (!note) return
  note.title = el('title').value.trim()
  note.content = el('content').value.trim()
  note.tags = el('tags').value.split(',').map(s => s.trim()).filter(Boolean)
  note.updated = Date.now()
  saveToStorage()
  renderList(el('search').value)
  closeEditor()
}

// Delete current note
const deleteNote = () => {
  if (!activeId) return
  notes = notes.filter(x => x.id !== activeId)
  saveToStorage()
  renderList(el('search').value)
  closeEditor()
}
Event Binding and App Initialization:
This aspect of the code handles user interactions and the application startup.
// Bind user events
const bind = () => {
  el('newNote').addEventListener('click', createNote)
  el('save').addEventListener('click', saveNote)
  el('delete').addEventListener('click', deleteNote)
  el('close').addEventListener('click', closeEditor)
  el('search').addEventListener('input', e => renderList(e.target.value))

  // Keyboard shortcut: Ctrl + N creates a new note
  document.addEventListener('keydown', e => {
    if (e.ctrlKey && e.key === 'n') {
      e.preventDefault()
      createNote()
    }
  })
}

// Initialize app
const init = () => {
  loadFromStorage()
  bind()
  renderList()
}

init()
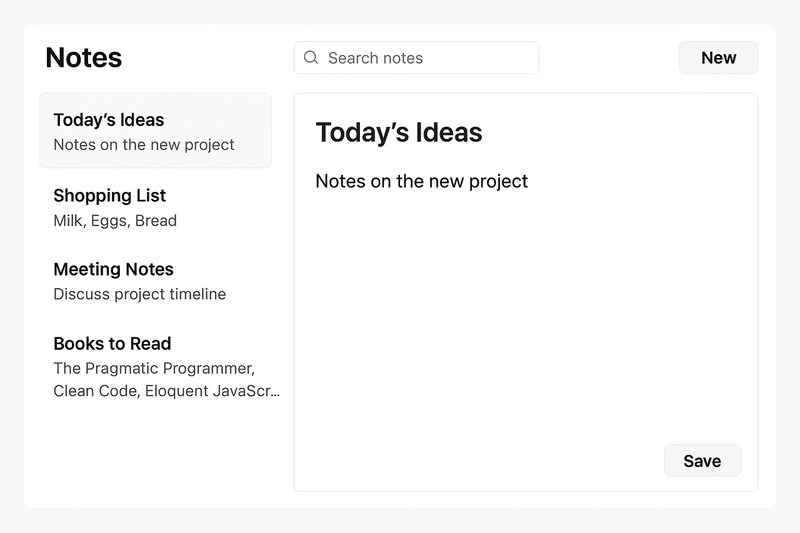
User Interface Overview
The user interface shows what the user will see when the user wants to use the product. The user will see Navigation Bar that includes title, search bar, and New Note button. A Notes List Panel that displays all saved notes. An Editor Panel that includes Text area with title, tags, and action buttons. Search and Filter that can filter notes by keywords or tags.
This is the exact image the user will see.

Future Enhancements
Possible future enhancements that can be added to the project includes the following:
-
Cloud sync across devices
-
User authentication and login
-
Rich text editing with formatting options
Conclusion
This tutorial showed how to build a complete note-taking app with HTML, CSS, and JavaScript. You learned how to manage data with local storage, render a dynamic interface, and handle user interactions. This is a foundation you can extend with more advanced features like categories, cloud sync, or authentication.