In this article, I’ll show you one way to create multiple themes using a server-side variable that automatically renders a theme in Rails (with esbuild).
What’s the use case?
- Your page has a parent resource that dictates your app’s branding
- You don’t want spaghetti javascript to handle themes.
Before jumping in, let’s understand how the compilation works
Rails has its own default asset pipeline (Sprockets). Its job is to pre-process, concatenate, minify, and serve these files (goes inside public/assets folder). Shifting to esbuild or webpack turns the approach to be more modern (easy to manage dependencies separately from the back-end), faster (written in lower level languages like Go) and flexible (we can configure each step of the process the way we want).
For our approach we will create structure like this:
- 1 Sass file with all your classes and common imports
- 1 Sass file with common variables/mixins
- 1 Sass file per theme with the variables you want to customize
- 1 method to control the theme to be rendered
Stylesheets
Starting with the common classes and imports, you need to create a partial, meaning, a file starting with an underscore(_). Give it a generic name like styles or global.
// app/assets/stylesheets/_global.scss
@import "bootstrap/scss/bootstrap";
// your other imports

// your classes
#some-id{
  background: $primary;
}

.some-class {
  background-color: $primary;
}
Then we can create a Sass partial to accommodate common variables which will be needed across all themes.
// app/assets/stylesheets/_common_variables.scss

//
// Color system
//

// GRAY SCALE
$white:  #fff !default;
$gray-100: #d5efd5 !default;
$gray-200: #e9ecef !default;
$gray-300: #dee2e6 !default;
$gray-400: #ced4da !default;
$gray-500: #adb5bd !default;
$gray-600: #85ba91 !default;
$gray-700: #a8dac4 !default;
$gray-800: #343a40 !default;
$gray-900: #212529 !default;
$black:  #000 !default;

// DEFAULT COLORS
$blue:    #0d6efd;
$indigo:  #6610f2;
$purple:  #6f42c1;
$pink:    #d63384;
$red:     #dc3545;
$orange:  #fd7e14;
$yellow:  #ffc107;
$green:   #198754;
$teal:    #20c997;
$cyan:    #0dcaf0;
$light-red: #f6d4d6;

// SYSTEM COLORS
$primary: #0C1439;
$dark: #0C1439;
$secondary:     $gray-600;
$success:       #00B554;
$info:          #5D97D1;
$warning:       #DB7000;
$danger:        #D5113B;
$light:         $gray-100;

$primary-50: #0C143905 !default;
$primary-100: #0C143910 !default;
$primary-200: #0C143920 !default;
$primary-300: #0C143930 !default;
$primary-400: #0C143940 !default;
$primary-500: #0C143950 !default;
$primary-600: #0C143960 !default;
$primary-700: #0C143970 !default;
$primary-800: #0C143980 !default;
$primary-900: #0C143990 !default;
Now, for our theme files, we want to follow a structure like this:
// import common variables

// define theme variables

// import styles
Why do we need to split this way?
All these styles need to be precompiled, meaning when you serve the application your SCSS turns into a single, ready-to-use compiled CSS file (the browser doesn’t understand Sass). While I’m using bootstrap for this example, override variables need to be defined before importing it. As well, before our classes. Each theme file will need to have ALL definitions. This might sound redundant, but in reality it just allows the system to serve one single file, instead of all of them, which makes it a bit more performant. Adding to the fact that being precompiled we can’t change it dynamically. Any other way would be to create duplicated classes and add a prefix of the theme, but in my opinion that sounds worse. Because you would need to compute for each HTML element what theme you would like to use.
Usually you start your project with an application.scss aggregating all your styles for your app.
In this case, our application will be the default theme to be precompiled.
The default theme:
// app/assets/stylesheets/application.scss
//
// Start Variables
//
@import "common_variables";

$primary: #0C1439;
$dark: #0C1439;
$secondary: $gray-600;
$success: #00B554;
$info: #5D97D1;
$warning:  #DB7000;
$danger:  #D5113B;
$light: $gray-100;

//
// End Variables
//

@import "global";
One theme, let’s call it halloween:
// app/assets/stylesheets/halloween.scss

//
// Start Variables
//
@import "common_variables";

$primary: #d5810e;
$dark: #292929;
$secondary: #590606;
$success: #d36546;
$info: #cfc2a1;
$warning: #d3804c;
$danger: #9A0539FF;
$light: #dac3a8;

//
// End Variables
//

@import "global";
Another theme and let’s call it xmas:
// app/assets/stylesheets/xmas.scss

//
// Start Variables
//
@import "common_variables";

$primary: #b80606;
$dark: #0d3903;
$secondary: #d3d3d3;
$success: #5da104;
$info: #87b6b6;
$warning: #dd4b2a;
$danger: #700909;
$light: #ffffbe;

//
// End Variables
//

@import "global";
Compilation
This alone doesn’t do anything.
When you decide to use Sass in your styles, you will need to compile them into a single .css files, which will be served and read in the browser.
Using esbuild, we need to map each SCSS file to its corresponding compiled CSS file.
You need to make sure you have
sassinstalled in your packages.
// 1
"build:css": "sass ./app/assets/stylesheets/application.scss:./app/assets/builds/application.css ./app/assets/stylesheets/halloween.scss:./app/assets/builds/halloween.css ./app/assets/stylesheets/xmas.scss:./app/assets/builds/xmas.css --no-source-map --load-path=node_modules",

// 2
"build:css:watch": "nodemon --watch ./app/assets/stylesheets/ --ext scss --exec \"yarn build:css\""
- Map your scss files into the expected css files
- A command (using
nodemon, you’ll need to add it as well) to watch for changes and compile them
Compile it using yarn build:css.
To see it in action, you can change manually the name of the stylesheet in your main layout, by replacing “application” with “xmas” or “halloween”.
<%= stylesheet_link_tag "xmas", "data-turbo-track": "reload" %>
If your styles aren’t compiling in development, make sure you don’t have any ‘builds‘ or ‘assets‘ inside
public/. Rails prioritises this folder when you precompile using Rails engine instead of esbuild. You can read more about here it has a small explanation at the end of the section.
Theme selector
Next, we need to automatically swap the theme based on some logic. In this case, I created a resource where I’m expecting a :party parameter and I will use it to determine which theme I want to serve.
# routes.rb
resources :parties, only: [ :show ], param: :party, path: "https://dev.to/"
In our ApplicationController or any other base controller, you need to create a function that looks at this parameter and determines the correct theme.
# application_controller.rb
helper_method :current_theme

# this is not private
def current_theme
  party = params[:party].to_s
  %w[xmas halloween].include?(party) ? party : "application"
end
By using
helper_methodwe’re allowing this method to be called from the view.
Basically, we are expecting a parameter that matches the name of one of our stylesheet files; if it doesn’t, we’ll render our default theme.
Now, we just need to call this function in our main layout application.html.erb, by replacing the string that defines the stylesheet we want to use.
Instead of a url parameter, we could eventually have a button in the UI, save the selection in the session and read from it in the
helper_methodwe just created.
<%= stylesheet_link_tag current_theme, "data-turbo-track": "reload" %>
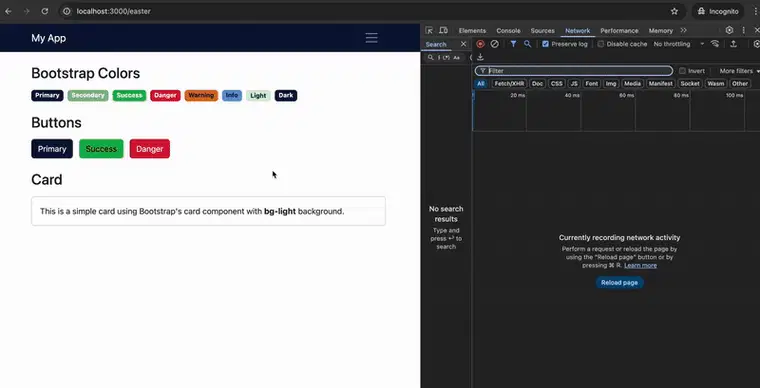
If you look at your Network tab in the browser’s inspector, you will see that only one file is downloaded and not all of them.

Happy Coding 🙂