Creating an AI-generated video is one thing, but producing a long-form narrative with a single, consistent character is a whole new challenge. You’ve probably tried to make a character appear in different scenes only to have the AI completely change their face, outfit, or even their entire appearance from one shot to the next.
I’ve been experimenting extensively with VEO 3 and have uncovered a simple, yet powerful, technique that solves this problem. It allows you to create engaging, multi-scene stories with the same character, opening up a world of new creative possibilities. The secret lies in a clever combination of detailed prompting, an old-school video trick, and VEO 3’s powerful features.
Step 1: The Character-Defining Prompt
The entire process hinges on creating a bulletproof character description that VEO 3 can consistently reference. Don’t just say “a man in a suit.” You need to be far more specific.
I’ve found it helps to use an AI text generator to create a detailed description. Start by giving it the basic scene idea, then ask it to describe all the characters in the scene with granular details like skin color, hair type, age, gender, and full outfit, including colors and accessories.
Once you have this comprehensive description, ask the text generator to split the prompt into two parts: one for the character description and a separate one for the action. This separation is key to our process.

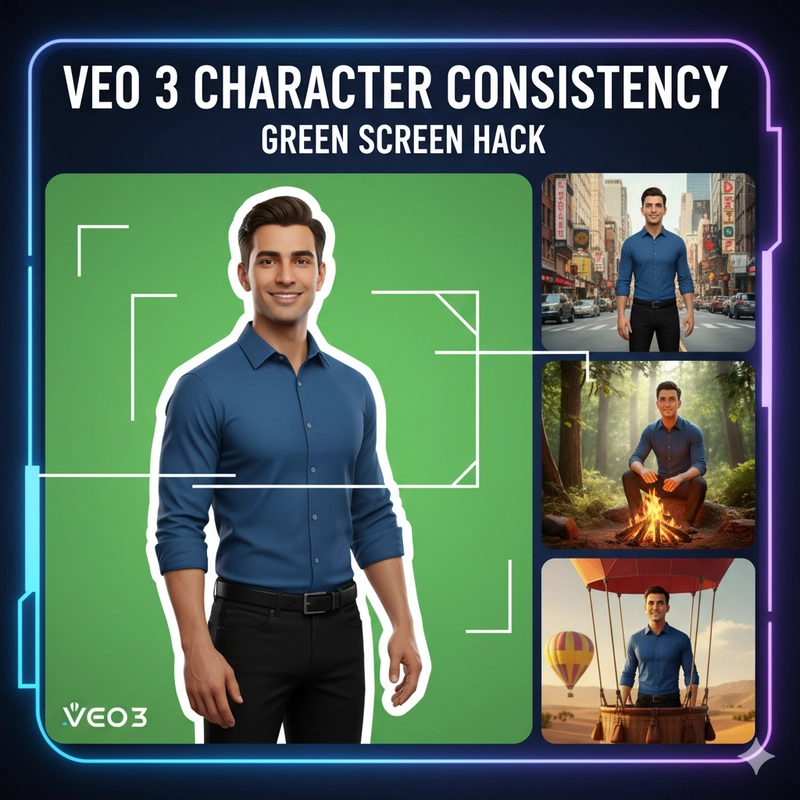
Step 2: The Green Screen Blueprint
VEO 3 has limitations on uploading images of people, which prevents us from simply uploading a headshot. The solution is to generate our character on a plain green or white background. This makes it incredibly easy for the AI to remove the background later, no matter the scene.
Using your detailed character description from Step 1, generate a new set of images. The key is to add a phrase like “on a plain solid green background” or “on a plain white background” to your prompt. I recommend generating both a full-body shot and a mid-shot to give yourself more options for different scenes.
These green screen images will serve as the base for every single shot of your character, guaranteeing consistency.
Step 3: Bringing the Scenes to Life
With your character images ready, you can now start generating your video clips.
In VEO 3, select the Frames to Video option.
Upload one of your green screen images as the first frame.
Next, use the action prompt you created earlier. The magic phrase is to add an instruction at the beginning of the prompt: “Instruct VEO 3 to change the background in the uploaded image.” Then, describe the new scene you want, such as “a busy downtown street” or “a tranquil forest.”
VEO 3 will take your green screen character and place them seamlessly into the new, described environment. You can repeat this process as many times as you need, changing the background and action for each new scene, but always using your original green screen character image.
Step 4: The Final Edit
Once you have all your individual clips, it’s time to assemble them into a cohesive narrative.
Download all the video clips and import them into your favorite video editing software.
The first frame of each clip will still show the green screen character before the background transition. Simply trim the beginning of each clip to remove this initial frame.
Arrange the clips in your desired order, and add transitions or music to make your long-form video flow smoothly.
By following this method, you can produce stunning, consistent long-form videos that maintain character identity across any number of scenes. It’s an essential technique for anyone serious about using AI for narrative storytelling.