In my last post I detailed how Kottster offers a great way to create an admin UI for startup projects. In that post I lamented how Kottster didn’t yet offer a way to provide a custom editor UI for specific database columns. Turns out they do and I had missed it in their docs. To test out this feature I created two non-trivial field editor components.
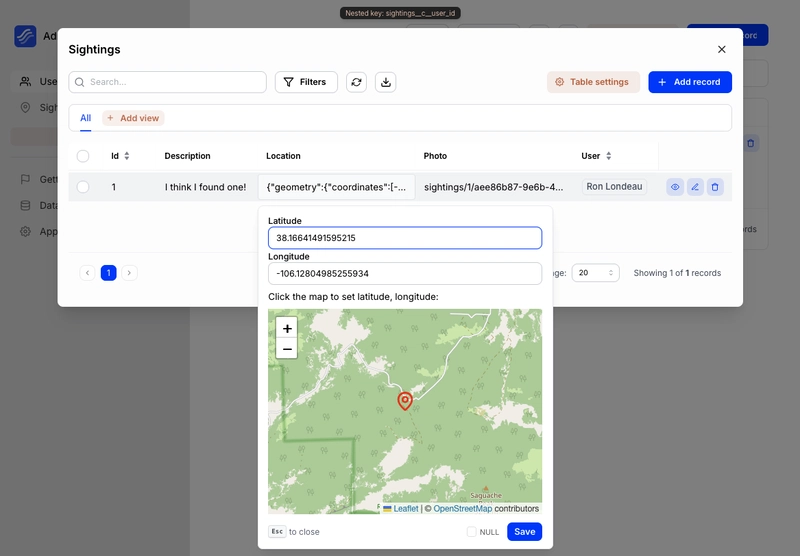
I created a location picker with a clickable map that uses GeoJSON:

I also created a file uploader which sends files to S3:

All of my code is here : https://github.com/aaronblondeau/wookie-sightings.
Here are the steps I followed to setup my development environment:
1) I created a new Kottster project (Typescript and pnpm): https://kottster.app/docs/
2) I installed drizzle (SQLite)
pnpm add drizzle-orm @libsql/client dotenv
pnpm add -D drizzle-kit tsx
3) I created a .env file with the path to my SQLite db.
DB_FILE_NAME=file:wookie-sightings.db
4) Following the drizzle config steps I created a schema.ts file: https://github.com/aaronblondeau/wookie-sightings/blob/main/schema.ts
This schema has users and sightings (this is a demo app for bigfoot sightings)
5) I created drizzle.config.ts : https://github.com/aaronblondeau/wookie-sightings/blob/main/drizzle.config.ts
6) I ran drizzle push to create the database and schema that I would use with Kottster:
npx drizzle-kit push
7) I launched Kottster and created my admin login.
pnpm dev
8) Next I connected my Kottster instance to my SQLite database.

9) I added a page for the users table.

10) And a page for the sightings table.

11) After creating these tables you can see that the default TextField editors would make it difficult to edit the photo and location columns.

12) The pages created in steps 9 and 10 above generate code in the app/pages folder of the Kottster instance. Check out the GitHub repo for all the code I created to make these custom field editor happen.
Discoveries
Overall the process of creating a custom field plugin was easy and straightforward. The docs for creating custom field components are here : https://kottster.app/docs/table/customization/custom-fields#modify-field-input-for-existing-columns
1) Move your renderComponent to its own file to prevent browser reloads.
Whenever you edit a file in the app/pages folder, Kottster will restart and reload the browser window. This makes developing a custom component pretty frustrating.
By moving my editor components to their own file I was able to get back into the usual React hot reload development cycle:
import { TablePage } from "@kottster/react";
import LocationEditor from "../../../components/LocationEditor";
import FileUploader from "../../../components/FileUploader";

export default () => (
  <TablePage
    columnOverrides={{
      location: (column) => ({
        ...column,
        label: "Location",
        fieldInput: {
          type: "custom",
          renderComponent: (params) => {
            return <LocationEditor params={params} />;
          },
        },
      }),
      photo: (column) => ({
        ...column,
        label: "Photo",
        fieldInput: {
          type: "custom",
          renderComponent: (params) => {
            return <FileUploader params={params} />;
          },
        },
      }),
    }}
  />
);
2) Don’t forget about nested tables.
Kottster automatically recognizes relationships in the database and lets you edit child rows in a modal window. To provide your custom field editor in the modal window you need to add it to the nested property of your parent table. This is how I setup the sighting (child) field editors in the user (parent) page:
import { TablePage } from "@kottster/react";
import LocationEditor from "../../../components/LocationEditor";
import FileUploader from "../../../components/FileUploader";

export default () => (
  <TablePage
    nested={{
      // To find this key, click open a nested table in the UI.
      // The key will appear in a small badge at the top of the screen, change __c__ to __p__
      sightings__p__user_id: {
        columnOverrides: {
          location: (column) => ({
            ...column,
            label: "Location",
            fieldInput: {
              type: "custom",
              renderComponent: (params) => {
                return <LocationEditor params={params} />;
              },
            },
          }),
          photo: (column) => ({
            ...column,
            label: "Photo",
            fieldInput: {
              type: "custom",
              renderComponent: (params) => {
                return <FileUploader params={params} />;
              },
            },
          }),
        },
      },
    }}
  />
);
At first I was confused on how to find the key to use for the nested object, but later realized it was right there in the UI:

3) Beware of extra React renders
I noticed a bit of inconsistency in how props are provided to the custom component depending on whether the field was for a new row or an existing row. I had to do a little bit of juggling to setup state for my component : https://github.com/aaronblondeau/wookie-sightings/blob/main/components/LocationEditor.tsx#L22.
4) Use presigned file upload urls
I am not sure what Kottster is using for communication between the frontend and backend for procedure calls. I do know that I quickly ran into issues trying to handle file uploads. See my notes in the FileUploader component.
To get around the procedure invocation limitations I wound up using a presigned upload URL to send files straight from the browser to S3. The getFileUploadUrl procedure generates the URL and then the FileUploader component uses fetch to send it straight to the bucket.
5) Backend procedures need to be in both the parent and nested pages to work.
I wound up creating the exact same api.server.ts file in both the users and sightings table’s folders:
import { app } from "../../_server/app";
import { fileUploadProcedures } from '../../../lib/fileUploadProcedures'

// https://kottster.app/docs/table/configuration/api#custom-server-api
const controller = app.defineTableController(
  {},
  fileUploadProcedures
);

// The Procedures type can be used on the frontend
// to get type-safety when calling server procedures.
export type Procedures = typeof controller.procedures;

export default controller;
This ensures that the procedures are available in modal dialogs when editing child rows.
Final Thoughts
If you need to create a quick admin UI for non-technical users to manage your app’s data, give Kottster a try. It’ll will get you really far out of the box and it provides customization options that handle the uses cases for most small teams and startups.